

When you see the timeline on this recipe, you are going to laugh and say who has 3 days to make a loaf of bread?! The truth is that you barely spend any time on it yourself – the wild yeast is doing all the work for you. As I mentioned in my post on Fruited Sourdough, it’s all about deciding when you want to bake and working backwards from there. I start the process on a Friday afternoon to bake on Sunday morning. The long, slow cold proofing allows the flavours to mature and take on even more of that distinctive sour, sourdough taste.
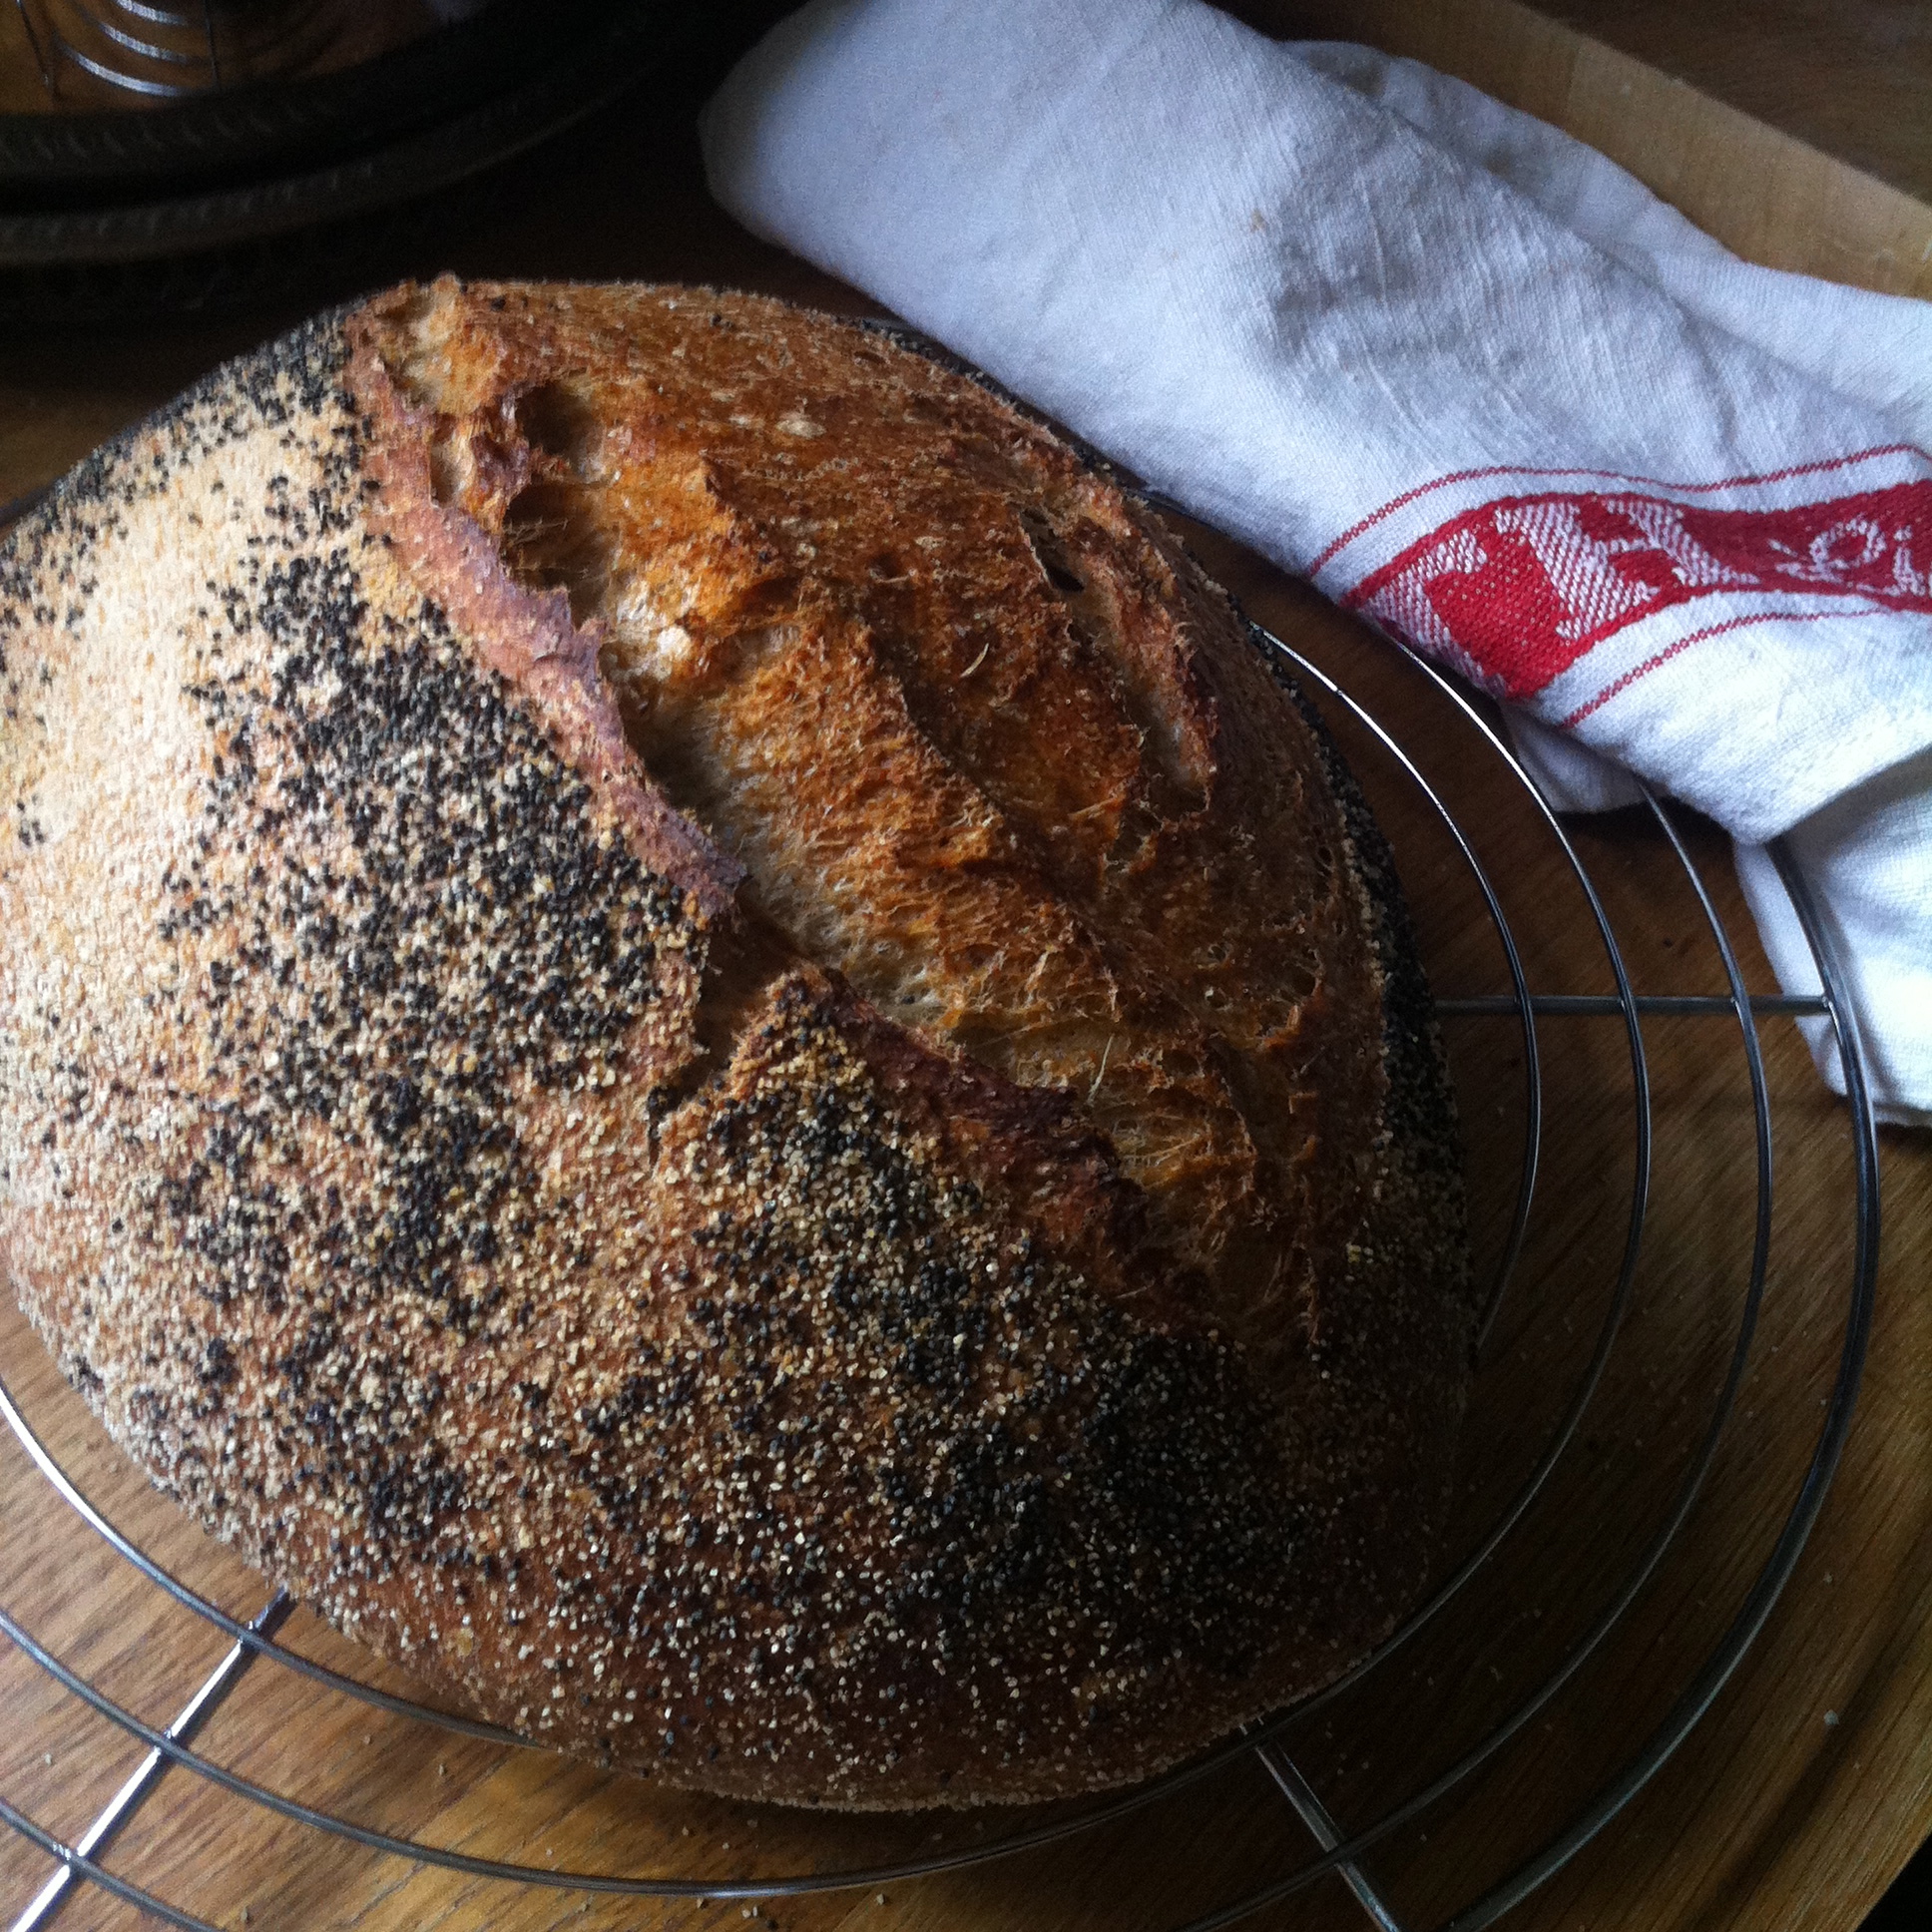
 I bake my bread in an lidded enamel roasting dish. Baking it like this, creates steam so that the crust doesn’t become so hard that the loaf cannot expand and rise in the heat. This bit is referred to as oven spring. Slashing the dough helps with creating a good oven spring too. If you don’t have a lidded pot then, bake on a sheet/pizza stone but pop a small tin of ice cubes or water into the oven to create that steam. The lid is removed halfway through baking and I am always childishly surprised and in wonder at how much the loaf has grown and split open in that time.
 I don’t know about you but I really struggle with counter space – I just seem to have so much out on it but that’s just the way I am. If I put things in a cupboard, they tend to shuffle off to the back and lie forgotten. So, when it comes to stretching and shaping dough, rather than clear away appliances and bottles of oil, I use a large stainless steel tray – it’s portable and so easy to clean. As an added bonus, the dusting flour/semolina etc is contained and doesn’t get everywhere! Stainless steel is really easy to work on too.
  So, if you have sourdough starter of your own or had some from Celia or me, give this method for Wholemeal Sourdough, a go!
 Always start with a bubbly bowl of starter. Following Celia’s advice, I take out ¼ cup of Twinkle (my starter) from the fridge at 1pm, feed her ¼ cup each of bread flour and filtered water, followed by ½ cup of each at about 4pm. By 8pm, Twinkle is bubbly and ready to go!
Set a large mixing bowl on the scales and add the ingredients, re-setting to zero between ingredients. Wholemeal is a dry thirsty flour, so you may need more water. Start with 300g first and add more if you need it. Squelch them all together and leave to autolyse for half an hour. Then stretch and fold a half dozen times, cover and leave to prove on the worktop, overnight. The following morning, stretch and fold the dough again and this time place in the fridge to prove for 24 hours. On Day 3, shape the dough, let it have a final short proof on the worktop and bake.
Wholemeal Sourdough Loaf
INGREDIENTS
- 150 g of bubbly starter
- 300 – 320 g of room temp or cool filtered water
- 250 g of organic wholemeal bread flour
- 250 g of organic strong white bread flour
- 9 g of fine salt
- olive oil
- fine semolina or rye flour
- poppy seeds
INSTRUCTIONS
Day 1 Evening
- Use a large mixing bowl and set it on the scales, re-setting to zero between additions.
- Tip in 150 g of bubbly starter.
- Then add 300g of the filtered water. (Start with the lesser amount first – you can always add a little more if the dough is too dry.)
- Measure in the bread flours.
- Add 9 g of fine sea salt.
- Squelch it all together with a clean hand until it is well mixed. This shouldn’t even take a minute. Add a little more water if the dough is too dry. Wholemeal is a thirsty flour! Scrape all the floury bits off your hand and back into the bowl. (I’ve been using latex disposable gloves – very little sticks to them.) Cover the bowl and set the timer for ½ an hour for the dough to autolyse.
- When the half hour is up, stretch and fold the dough, inside the bowl, 5 or 6 times. Clean the bowl then smear some olive oil in it and place the dough inside, seam side down. Cover and leave out on the worktop, overnight.
Day 2 Morning
- In the morning, the dough will be bubbly and have doubled in volume at least.
- Dust the work surface (I use a large stainless steel tray) with fine semolina or rye flour (white tends to stick) and gently scrape the dough out, onto it. Repeat the stretch and fold a half dozen times. Place seam side down in a large oiled bowl, cover and place in the fridge.
Day 3 Morning
- The next morning, the dough will have risen and is ready to bake. You could even leave it in the fridge for another day for the flavours to develop.
- Pre-heat your oven to 240/250C – as high as it will go.
- Dust the work surface and gently scrape the dough out, onto it. There is no need to punch down – you want to keep as many of those bubbles in the dough as you can.
- Pull the outside thirds into the middle, then turn it over so that it is seam side down and shape it as you wish. Try and pull the outside of the dough as tightly as possible to get a good gluten coat which will hold it’s shape well.
- Oil some cling film and cover the dough on the worktop for about 45 minutes to an hour, for the final prove. The dough should warm up a little and also expand. If your kitchen is really warm, it may only take half an hour – so keep an eye on it, setting the timer as this is the only proofing that should NOT be over done.
- Then, after it has finished the final proofing, remove the cling film, and sprinkle generously with poppy seeds.
- Slash the top of the dough and place it in a lidded **enamel roaster/dutch oven. Cover with the lid and place in the oven. Turn the heat down to 220C (fan assisted) and bake for 20 minutes.
- After 20 mins, remove the lid and carry on baking for another 20 mins. Check to see if the bread is done by tapping it on the underside – it should sound hollow. If you like a crispy crust, then place directly on the oven rack and bake for another 5 minutes. Otherwise, remove from the pot and cool on a wire rack.
**If you don’t have a lidded pot, you can, of course, bake the bread on a baking sheet/pizza stone. In that case, place a few ice cubes/water in a small tin and put this in the oven to create the steam that baking in a lidded pot does.

Ooooohh! You and Elaine are both set to kill with your sourdough today. 😍
A M A Z I N G!!
LikeLiked by 1 person
I know, hasn’t Elaine just done such a great job with it? I’ve emailed you, by the way x
LikeLiked by 2 people
Just saw the email Selma :)
LikeLiked by 1 person
Thank you ladies 😀 xxx
LikeLike
Your bread looks delicious Selma – makes me want to make sourdough bread again. I let my starter go unfortunately and need to get more. I use to add sour salt (citric acid) to my bread and bought it from one of my favorite baking sources, King Arthur flour. It did add a nice tang to the bread I made :)
LikeLike
Hi Judi thanks for the tip on using citric acid – I am going to look into that. I’ve sent you an email so look out for it x
LikeLiked by 1 person
I add citric acid/vitamin c powder to my wholemeal & granary loaves as it assists with rise
LikeLiked by 1 person
I just sent you an email Selma – thanks so much for your thoughtfulness. I am looking forward to making some bread <3
LikeLike
By the way you can search my site “sourdough” for 4 recipes I have posted. There are muffins and french toast, not anything like that beautiful loaf you made. At least not lately – I use to make bread like that :)
LikeLiked by 1 person
GORGEOUS & Inspiring!!
LikeLike
Thanks so much – I am in such awe of this magical stuff!
LikeLike
You are just the bread queen these days Selma. This looks so professionally done, yay you!
LikeLike
Thanks Loretta – I’m only baking one, maybe two loaves a week – but they are turning out to be absolute beauties with that starter!
LikeLike
Okay, that is some serious sourdough loaf! I’m a sucker for crusty chewy bread. Wouldn’t mind taking a little of Twinkle if you’re still sharing 😃😃 Did you get an email from Julianna?
LikeLike
Yes, I did and I have replied now – looking forward to the weekend! It’s going to be another brilliant party if the last was anything to go by! I’ve emailed you so look out for it x
LikeLiked by 1 person
This is a gorgeous loaf of bread. I love how crusty and chewy it looks. I would love to know how to get some starter too.
LikeLike
Thanks so much Julie – I’ve emailed you so, look out for it x
LikeLike
What a beautiful loaf! I can almost taste it!
LikeLike
Thanks so much Karen!
LikeLike
I can see why my sourdoughs never used to rise like I thought they should. Time. I wish I had known this method when I was making them, am sure I would have had a better result. Looks amazing Selma. There is something very satisfying about baking bread.
LikeLike
Ardys, I am sure that Celia would be happy to send you some starter. I do get a good rise when just doing the basic overnight recipe too but it just needs time to develop and become gassy! There is lots on the internet now about GF sourdough – I admit to not having looked at any of the links but it might be worth checking out x
LikeLiked by 1 person
Whoa, Selma… you’re the queen of beautiful loaves lately! I thought the fruited loaf was in a class all it’s own…but it better make room for it’s gorgeous cousin! This wholemeal loaf sounds equally delicious! Don’t get me started on that crust…. :)
LikeLike
Aw, thanks Nancy! I make the wholemeal most weeks so that Jake can have it for brekkie – it is so low glycemic, especially with peanut butter that he doesn’t have that mid morning crash. I don’t actually eat much of it myself just because, once I start….though I did have my fair share of the fruited loaf!!
LikeLiked by 1 person
Another gorgeous bread, Selma :)
LikeLike
Linda, thank you!
LikeLike
Wow! I am just back from Elaine’s and couldn’t help admiring her sourdough loaf.And what have we here. This is one gorgeous loaf. Nice crust and airy inside. Selma if only I lived in your neighborhood 😍😋I would have carried at least half of it back. 💞🍞
LikeLiked by 1 person
I wish you did too – then I could make more and give you a whole loaf!!
LikeLiked by 1 person
Yumm…. I will look for packers and movers right now .
LikeLiked by 1 person
Another absolute beauty Selma! And I love the poppy seeds 😀😀😀😀 I’m just loving this sourdough love xxx
LikeLike
Thanks – you are not doing too bad yourself!!
LikeLiked by 1 person
Thanks to you xx
LikeLike
It looks stunning, S! I love that the starter can keep bouncing back for so long – not all starters are so resilient. I’ve never tried a full second day, let alone a third! I’ll give it a go! xxx
LikeLike
I’ve just made a fruit loaf that cold proved for 2 days after an overnight prove on the worktop! I will tweet the photo later x
LikeLike
Ah-huh!!!! Busted!!!! :)
I love how you left a comment on my blog that your cooking time was way less than mine, BUT not this one, my lovely friend :) Not this one :)
I do appreciate all your detailed instructions and a warning, but even that, I love love love how the bread turned out beautifully and I MIGHT even try to make it. This bread looks SO SO SO delicious & awesome, Selma <3 <3 <3
LikeLike
Haha Pang! Busted indeed! Yes, this takes days rather than hours but it does produce a delicious and rather beautiful loaf or it just wouldn’t be worth it. My mind boggles to think how gorgeous your styling and photographs would be if you made bread…x
LikeLike
This looks beautiful!!! Amazing!!!! Makes me want to feed my starter right NOW ;-)
LikeLike
Love this comment, Ginger! I’ve just really loved baking with it.
LikeLike
Can I ask a question: is this method best for wholemeal loaves or can I use this long prove method with 100% white flour too?
LikeLike
I am no expert but from what I have read you can do this with white flour too. Jake likes the flavour of wholemeal (I know . It’s not normal!) so I very rarely make a 100% white. Even my fruited bread has wholemeal flour in it.
LikeLiked by 1 person
Believe me, I’m much happier making wholemeal bread but my guys definitely preferred the white. I might try it with the brown bread flour I’ve got actually…?
LikeLiked by 1 person
Pingback: Let’s Talk About Fermentation |
This is a beautiful loaf Selma and you know I love making bread!
LikeLike
Thanks so much! And yes i do know!!
LikeLike
My fave loaf lately. Yum!
LikeLike
Thanks Shanna! I see that you are back blogging – yay! Will stop by next week and have a proper read x
LikeLike
Pingback: Middle Eastern ‘Maneesh’ flatbreads and the joys of za’atar.. | foodbod
Pingback: In My Kitchen February 2015 | birgerbird
Pingback: In My Kitchen – April 2015 | Selma's Table
Pingback: Devilled Eggs on Sourdough | Selma's Table
Pingback: Selma – The Sparkling Diva | simplyvegetarian777
Pingback: A Tribute to Selma: Wholemeal Sourdough Loaf | Bread and Tortillas
Hi, where or how can I make “bubbly starter?” Thank you.
LikeLiked by 1 person
Dear Debra Julin, I regret to inform you that very sadly Selma passed away in 2015.
LikeLike
Pingback: In My Kitchen February 2015
With the starter, the 1/4 flours you are adding, are these taken from the recipe quantities or are they extra? Thanks.
LikeLike