Ricotta and Chive Cakes

Ricotta and Chive Cakes | Selma's TableI have a friend who I think of as the Imelda Marcos of lunch boxes. She has the most incredible selection – ones for breakfast, ones with separate compartments for salads and dressing, ones that can go in the microwave, spill proof soup mugs, ones that have their own placemat, ones that have their own cutlery – you name it – she’s most probably got it! She takes the most delicious things to work and obviously saves a fortune in the process.

Ricotta and Chive Cakes | Selma's TableHave you ever totted up what you spend on food during the working week? I’m not talking about going out for restaurant  lunches but the stuff you get from the thousands of takeaway sandwich bars and cafe’s that line our streets. Starting with your morning latte and yoghurt pot/muffin/croissant to a mid morning snack, lunch of sandwiches/salads/noodles/sushi, coffee or tea, juice etc…it really adds up. At let’s say £5 – £10 a day, that’s £25 – £50 a week which works out to £1,250 – £2,500 a year! With a little fore thought and organisation, you could so easily be taking in your own food which will be delicious, not full of salt, sugar, preservatives and additives and saving you a fortune at the same time. Those Manolos might be yours sooner than you think…

Ricotta and Chive Cakes | Selma's TableAnyway, I popped round her house recently and she gave me a ricotta cake to try – she had mentioned them a few times in the past and said how wonderful they were and how perfect in one of her “salady” lunch boxes and I could immediately see why. It was so savoury; light but filling and extremely low carb, so, no mid afternoon carb coma. She did tell me what was in them, but all I could remember was the ricotta and parmesan. Possibly basil.

The other day, I bought some ricotta to make ravioli and had some left over so thought I would give the cakes a go. I did a little googling to get the proportions right and came up with these…They are so easy. Just whisk up a couple of eggs with salt and pepper, snip in the chives and stir in the cheeses. Spoon into very well greased tins, top with a little more parmesan and bake. So, so delicious!

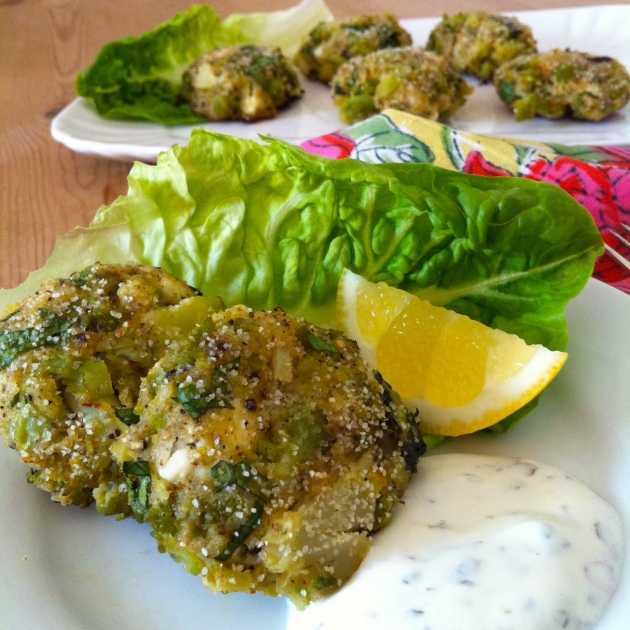
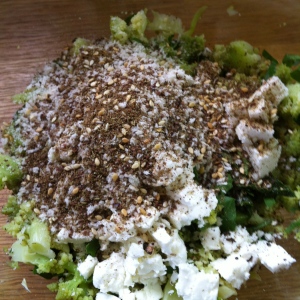
These are really quite small – you would probably want 2 or 3 – maybe more, per serving, depending on your appetite. I also think that these would be lovely with a little grated lemon zest in them and maybe a sliver of sundried tomato on top. Thyme or oregano would work well here too. So many possibilities…

P.S. if you click on the link to the Manolo Blahnik website, there is THE most fabulous short film about how, as a child growing up in the Canary Islands, Manolo Blahnik made shoes from sweetie wrappers for lizards. I used to make Christmas decorations out of sweetie wrappers – think I may have missed my calling…

Ricotta and Chive Cakes

  • Servings: makes about 22 small cakes
  • Difficulty: easy
  • Print

INGREDIENTS

  • 2 large eggs, free range or organic
  • ½ tsp salt
  • ½ tsp ground black pepper
  • 1 bunch of chives about 25g
  • 500g ricotta cheese
  • 60g finely grated parmesan cheese, halved

INSTRUCTIONS

  1. Pre-heat the oven to 150C/300F. Thoroughly grease and flour a couple of 12 hole patty tins (the shallow kind used for mince pies or Yorkshire puds).
  2. Lightly whisk the eggs in a medium sized bowl. Whisk in the salt and pepper and snip in the chives – scissors are much better than a knife for chives.
  3. Add the ricotta and half the parmesan and whisk until all the ingredients are well mixed together.
  4. Pop a tablespoon of the mixture into each hole and lightly smooth over the tops.
  5. Evenly sprinkle over the remaining parmesan cheese.
  6. Bake for 20 minutes or until lightly golden. Let cool for 5 minutes then remove from pans to either finish cooling on a wire rack or eat warm with a salad.
  7. Store in a lidded container in the fridge for up to 7 days.
© Selma Jeevanjee and Selma’s Table, 2015. Unauthorised use and/or duplication of this material, including photographs without express and written permission from this blog’s author and/or owner is strictly prohibited. Excerpts and links may be used, provided that full and clear credit is given to Selma Jeevanjee and Selma’s Table with appropriate and specific direction to the original content.

Masala Chai Banana Bread with Coconut Cream Cheese and Cardamom Icing

Masala Chai Banana Bread with Coconut Cream Cheese and Cardamom Icing | Selma's TableThis year’s UK Master Chef series on the television has been fantastic. The final five were all incredibly creative and really put through their paces as the competition ruthlessly progressed. (Don’t worry, there are no spoilers here if you haven’t watched the final episode to crown the winner.)  Of the final five, I was really inspired by Emma whose love of middle eastern spices and modern use of ingredients mirrors the zeitgeist made mainstream by Ottolenghi.

Masala Chai Banana Bread with Coconut Cream Cheese and Cardamom Icing | Selma's TableYou may recall that Adagio Tea sent me a sample pack of their gorgeous teas to try. I wrote about their artisan teas in last month’s IMK post. They have a huge range and their green teas alone are worth a look at. Their Masala Chai is quite incredible – it has the deep flavour that I remember from my childhood and is chock full of whole spices like cloves, cinnamon bark, cardamom seeds and ginger as well as black Ceylon tea.

Masala Chai Banana Bread with Coconut Cream Cheese and Cardamom Icing | Selma's TableSpurred on by Emma’s creations on Master Chef, a LOT of dangerously dark bananas and Adagio’s Masala Chai, I adapted my go-to recipe for Banana Bread from How to be a Domestic Goddess by Nigella Lawson. It’s a recipe I have been making for years and it never lets me down. It’s particularly devilish and delicious when made with chocolate chips instead of fruit, but that is another story!

Masala Chai Banana Bread with Coconut Cream Cheese and Cardamom Icing | Selma's TableBecause I had so many bananas I used them all and in retrospect, it was too much and caused the loaves to become heavy and sink in the middle when cooling. In the recipe below, I have written the amounts as they should be and not as I did this time.

I quite often use frozen bananas but let them thaw and drain off the liquid before mashing and mash the bananas coarsely as this enables the loaves to remain lovely and moist. I prefer to use light brown sugar for a deeper more caramel flavour too.  Steeping the fruit in very a very strong solution of masala chai gives them a haunting flavour when you bite into a plumped up morsel. I have enhanced that with a little cardamom stirred through the batter too.

Masala Chai Banana Bread with Coconut Cream Cheese and Cardamom Icing | Selma's TableThe icing. Oh my God, the icing! It’s just sublime. I wanted to compliment the heady banana and masala chai flavours of the loaf and put this icing together. The flavour reminds me of coconut burfi or penda (which my father adored) – Indian sweets as Jake refers to them…

Masala Chai Banana Bread with Coconut Cream Cheese and Cardamom Icing | Selma's Table

I really like using coconut powder as you can get the depth of flavour you want and also the thickness by adjusting the liquid to powder ratio. A further rummage in the pantry led me to the gorgeously fragrant rose petals I bought recently on a foray into Shepherd’s Bush with Elaine and a bag of pistachio nuts.

Masala Chai Banana Bread with Coconut Cream Cheese and Cardamom Icing | Selma's TableI ended up with a Magic Carpet Banana Bread! I think Emma would approve!

Masala Chai Banana Bread with Coconut Cream Cheese and Cardamom Icing

  • Servings: Makes 2 loaves
  • Difficulty: easy
  • Print

Adapted from “Banana Bread” How to Be a Domestic Goddess by Nigella Lawson

My loaf tins are standard 900g/2 lb loaf tins. Measurements may vary slightly from manufacturer to manufacturer, but  they should be approximately 23cm x 13cm x 7cm  or 9″ x 5 ½” x 3″.

INGREDIENTS

  • 150 g mixed dried fruit (like berries, cherries, figs and sultanas)
  • 75 ml of very strong brewed Adagio Masala Tea Blend
  • 175 g Plain/AP flour
  • 2 ½  tsp baking powder
  • ¼ tsp cardamom powder or 2 drops of cardamom essence
  • ½ tsp salt
  • 125 g unsalted butter, melted and cooled
  • 150 g light brown sugar
  • 2 large eggs at room temperature
  • 3 medium very ripe bananas
  • 1 tsp vanilla extract

For the Coconut, Cream Cheese and Cardamom Icing

  • 3 Tbsp coconut powder
  • 1-2 Tbsp warm milk
  • 1 x 180 g pack of cream cheese
  • 1 x 250 g tub of mascarpone cheese
  • 5 – 6 Tbsp icing sugar
  • 3 drops cardamom essence or the powdered seeds of 2 cardamom pods
  • chopped pistachios (optional)
  • edible dried rose petals (optional)

INSTRUCTIONS

  1. Steep the dried fruit with the hot masala chai for an hour (or microwave on high for 2 minutes and steep for as long as you can)
  2. Pre-heat oven to 170C/325F and either pop a paper case into each of two loaf tins or line with two strips of parchment paper. Put the butter in a heat proof bowl and place in the oven to melt. Check after 3-4 minutes.
  3. Place the flour, baking powder and salt in a small bowl and whisk to combine. Set aside.
  4. Mash the bananas, coarsely, and set aside.
  5. With an electric mixer, beat together the cooled melted butter and the sugar until creamy and caramel in colour.
  6. Add the eggs, one at a time and make sure to beat well after each one.
  7. Add the bananas and the vanilla extract and mix well and finally, stir in the drained fruit.
  8. Scrape the batter into the prepared loaf pans and bake for 50 minutes. Test with a wooden skewer which should come out moist but not with batter clinging to it. Let cool completely before icing.
  9. While the loaves are baking, make the icing: stir the coconut powder into warm milk until smooth.
  10. In a medium sized bowl, mix together the cream cheese and the mascarpone with a rubber spatula then add the coconut mixture and stir in. Sift in the icing sugar, mixing well and taste after you had added 4 Tbsp – it may be sweet enough. Stir in the cardamom essence or the powder and set aside in the fridge. When the loaves are cold, spread with the icing and top with the chopped pistachios and rose petals if using them.
© Selma Jeevanjee and Selma’s Table, 2015. Unauthorised use and/or duplication of this material, including photographs without express and written permission from this blog’s author and/or owner is strictly prohibited. Excerpts and links may be used, provided that full and clear credit is given to Selma Jeevanjee and Selma’s Table with appropriate and specific direction to the original content.

Devilled Eggs on Sourdough

Devilled Eggs on Sourdough | Selma's Table The bastion of all things butter, Lurpak, commissioned a study into lunches and found that we are creatures of habit, eating the same things pretty much everyday. Other than food bloggers (who seem to eat the most amazing meals, if Instagram is anything to go by), most people seem to eat sandwiches, usually cheese and/or ham. Sandwiches do make a very easy option at lunch time but the filings don’t have to be so mundane. 10 minutes of preparation the night before ensures that you have a tasty, nutritious and delicious lunch for the next day that you will be really looking forward to. And probably eating at 11 a.m. because you can’t think of anything else! Devilled Eggs on Sourdough | Selma's TableFillings can be made on Sunday or in the evening after work and the sandwiches assembled in the morning or even at your desk/office kitchen. To stop sandwiches going soggy, butter your bread (with Lurpak, naturally) but pop your filing into a small container. The container can go into the fridge at work, while the bread can stay at room temperature. Then all you have to do is a quick assembly job before tucking into a freshly made and delicious sandwich. Below are some easy but tasty fillings. When Jake used to take a packed lunch, I used to make his sandwiches in the morning. It was usually a small baguette stuffed with one of the fillings below and lots of salad leaves too. At least once a week, by request, I also used to make one for one of his best friends – I don’t think his mum ever knew…

  • Fry off or roast some red and yellow peppers with a couple of sliced onions and keep them in the fridge. Spread a wrap generously with soft goats cheese, strew with the peppers, a little freshly chopped mint and rocket leaves and roll up, slice in half and wrap. (The cooked peppers and onions keep for 5 days at least, well covered, in the fridge.
  • Chop up a packet of pre-cooked prawns, a couple of spring onions, a little bundle of chives, half a mango, a few fresh coriander leaves. Include tiny squares of finely chopped red chilli if you like a little heat. Squeeze over some lemon juice and grind over some pepper. Taste to adjust seasoning. Take in a container along with a few whole baby gem lettuce leaves. Spoon the mixture into each lettuce leaf for a carb free lunch! (Fish and shellfish do not keep well so make this the night before.)
  • Chop up a portion of left over roast chicken (or roast off some thighs) and stir in a spoonful of pesto and a little creme fraiche or mayonnaise. Stuff into a buttered baguette and top with sliced tomatoes and a few basil leaves. (Roast chicken keeps for 3 or 4 days in the fridge)
  • Chop up a packet of chicken tikka pieces and stir through a little tzatziki and fresh mint. Spread a little mango chutney on a wrap, top with the chicken mix and a few salad leaves. Roll, slice and wrap.
  • Homous, shredded left over roast lamb and mâche lettuce are delicious in a wrap. You can substitute shredded carrot for the lamb to make it vegetarian and vegan.
  • A tin of well drained tuna and a finely chopped stick of celery, mixed with a really small amount of mayonnaise, lots of freshly ground black pepper and lemon juice can be put in a container along with a handful of cucumber slices and buttered bread of your choice. Assemble just before eating.

If you are avoiding carbs, most of these fillings can be eaten using lettuce leaves as the “bread” or just dolloped on top of lots of salad leaves and slices of cucumber. Elaine has a lovely recipe for mayonnaise on her blog, foodbod, if you want to have a go at making it yourself. Devilled Eggs on Sourdough | Selma's TableThese smoky devilled eggs are a favourite and the mixture keeps well for a couple of days in the fridge. Buy the best eggs you can afford – battery eggs taste of nothing – please don’t buy them. Look at the deep yellow colour of the yolks of these…

Eggs are a soft in texture and benefit from something crisp and salty on top. I had mine with salmon but Jake had his with crispy fried turkey bacon and it was a much nicer contrast in textures. Devilled Eggs on Sourdough | Selma's TableThe sharp, lemony beetroot or radish slices make a welcome contrast to the richness of the eggs. Devilled Eggs on Sourdough | Selma's TableThis is the crumb shot of my home made sourdough loaf made with my starter, Twinkle.

Devilled Eggs on Sourdough

  • Servings: 4
  • Difficulty: easy
  • Print

INGREDIENTS

  • 6 large fresh eggs – organic or free range at room temperature
  • 3 Tbsp mayonnaise
  • 1 tsp smoky paprika
  • ¼ – ½ tsp cayenne pepper – adjust this to your palate or leave it out if there are young children involved.
  • ¼ tsp salt
  • lots of freshly ground black pepper
  • 1 Tbsp chopped fresh parsley and or chives
  • 4 slices of sourdough bread
  • Lurpak butter

TOPPINGS

  • smoked salmon
  • crisp fried shallots or
  • crispy bacon/turkey bacon (chop and fry in a non stick pan with no added fat) or
  • chorizo cubes (fry in a non stick pan with no added fat, stirring frequently until it’s oil runs and the edges crisp up)
  • thinly sliced raw chioggia beetroots or radishes, tossed in a little lemon juice and salt.

INSTRUCTIONS

  1. Place the eggs in a small lidded pot and cover with cold water. (If the eggs are fridge cold, cover with tap-hot water for 5 minutes then drain. The shells will crack otherwise) Place over medium low heat and bring to a boil. Let them boil for 1 minute then remove from the heat and let them sit, covered in the pot for 9-10 minutes. Drain and fill the pot with cold water to stop them cooking any further. Crack the shells (I give the fat end a bash in the sink) and put back in the cold water. The water gets between the membrane and the egg and makes it very easy to peel.
  2. While the eggs are cooking;  1. Put the shallots or bacon or chorizo on to fry. 2. Whisk together the mayo, smoky paprika, cayenne, salt and pepper in a medium sized bowl. 3. Slice the chioggia beetroot or radishes as thinly as you can and toss in lemon juice. 4. Chop the parsley/chives.
  3. Chop the boiled eggs  (smaller that in my photos as they are less likely to fall off the bread than chunky pieces) and stir into the mayonnaise mixture together with the parsley/chives. Taste and adjust seasoning if necessary. I don’t like too much mayonnaise but feel free to add more if you like your fillings creamier.
  4. Butter the bread and top with the eggs and crispy topping of your choice and a few slices of the lemony chioggia or radish slices on the side.
© Selma Jeevanjee and Selma’s Table, 2015. Unauthorised use and/or duplication of this material, including photographs without express and written permission from this blog’s author and/or owner is strictly prohibited. Excerpts and links may be used, provided that full and clear credit is given to Selma Jeevanjee and Selma’s Table with appropriate and specific direction to the original content.

Spicy, Slow Cooked Butter Beans with Chorizo

Spicy, Slow Cooked Butter Beans with ChorizoNo matter what I do, when I cook meat in the slow cooker (aka the crock pot), it becomes wooly and all the delicious seasonings I have added become dull, dull, dull. On the other hand, I love the texture and flavour of meat slow cooked in the oven or braised on the stovetop. Perhaps the sealed environment of the slow cooker which is essentially slow boiling the meat over a very long period of time, relegates the proteins and the seasonings to a pappy, bland insipidness. Perhaps oxygen and evaporation play a crucial role in the flavour and texture stakes. I don’t know but what I do know is that there are millions of people out there who do make it work and work well – there are some fabulous sounding recipes out there and many a crock pot devotee as a quick search on Pinterest will confirm. Nonetheless, I cannot make it work for me. I have tried “roasting” a chicken in it, braising brisket and stewing meat. I’ve used it to make stock and flavoured legumes. I’ve adjusted cooking times, reduced liquid, increased flavourings and spices – all to no avail. Everything just tastes dull; no matter how much I try and adjust the seasoning after the cooking, I just cannot rescue the texture or the flat taste.

Spicy, Slow Cooked Butter Beans with Chorizo | Selma's TableThat being said, what I do like is how well it cooks dried legumes like chickpeas and butter beans without the need to pre-soak or watch that the pot does not boil dry. I chuck together the beans, bay leaves and water just before going to bed and in the morning, the beans are soft, juicy and plump, ready to be sauced for supper that evening.

Spicy, Slow Cooked Butter Beans with Chorizo | Selma's TableBut, I hear you say, why bother when you can get tins of the stuff in practically any corner shop and grocery store? Well, the texture and the flavour is much, much nicer when cooked from dry. I find the liquor in the tins tastes tinny and have to rinse the beans very well indeed before using them. Having said that, I always have a couple of tins in pantry as they do come in very useful for those last minute meals but if I have the time, I much prefer to cook them from dry.

Spicy, Slow Cooked Butter Beans with Chorizo | Selma's TableI would suggest that the first time you make these, you do them during the day, when you are likely to be around to check on the water in the crock. I have found that the measurements below are perfect for my crock – the beans cook and soak up just enough water, leaving perhaps a cup of thick liquid that has not been absorbed and is just perfect to thicken the sauce with.

Spicy, Slow Cooked Butter Beans with Chorizo | Selma's TableThe chorizo sauce is just delicious!! Lemony, tangy, spicy and rich – do, please take the time to caramelise the onions slowly – you can get on with something else in the kitchen for the 10 minutes or so that it will take for them to slowly turn a golden brown. They lend such a depth of flavour to the sauce. And of course you can use the contents of 2 very well rinsed cans of butter beans instead and just use water where the recipe calls for bean cooking liquid. If you don’t have a slow cooker and want to use dried beans, then cook the dried beans, according to the manufacturers instructions on the pack which usually involve soaking them for 8 hours and then simmering them for one or two hours afterwards.

Spicy, Slow Cooked Butter Beans with Chorizo

INGREDIENTS

  • 250 g dried butter beans
  • 650 ml water
  • 2 bay leaves
  • 1 tsp olive oil
  • 1 onion finely diced
  • salt
  • 1 cooking chorizo sliced into ½ cm rounds
  • 1 tsp fennel seeds
  • ½ – 1 tsp chilli flakes
  • 2 tsp smokey paprika
  • 2 Tbsp tomato paste
  • 2 large tomatoes diced
  • handful chopped parsley

INSTRUCTIONS

  1. Either the day before or at least 9 hours before you wish to eat; place the dried butter beans and bay leaves in the crock, top with water cook on low heat for 7 – 8 hours. I don’t find it necessary to add any salt or baking soda. The beans will become plump and tender, having soaked up most of the water.
  2. An hour or so, before you wish to eat; heat the olive oil in a pan and stir in the finely chopped onion. Sprinkle with a little salt and cook on a low heat for about 10 minutes or until golden brown. Take time to cook them slowly to get that deep flavor from the caramelised onions.
  3. Stir in the sliced chorizo and the spices. Let this cook gently until the oil turns orange from the chorizo.
  4. Add a ladle of the bean cooking liquid, stirring to deglaze the pan by scraping any sticky bits off the bottom. When it has evaporated, stir in the tomato paste and the diced tomato. Stir and add another ladle of the bean cooking liquid, when it has evaporated, add a final one. There shouldn’t be much liquid left in the beans – try and get as much of it into the chorizo mixture to evaporate. If you don’t have much liquid left in the beans then use water instead.
  5. Stir in the butter beans, taste and adjust the seasoning if necessary. Simmer gently for half and hour to allow the flavours to blend and any excess liquid to evaporate.
  6. Just before serving, stir in the parsley.
  7. Serve with rice, a dollop of greek yoghurt and a sharp green salad.

Left overs are even better the next day!

© Selma Jeevanjee and Selma’s Table, 2015. Unauthorised use and/or duplication of this material, including photographs without express and written permission from this blog’s author and/or owner is strictly prohibited. Excerpts and links may be used, provided that full and clear credit is given to Selma Jeevanjee and Selma’s Table with appropriate and specific direction to the original content.

Chermoula Spiced Aubergine Wedges with Tahini Sauce and Feta

Spiced Aubergine Wedges | Selma's TableWhile I was in Cape Town, I stayed with friends in their gorgeous villa.  Justin has designed and decorated the house so that it is not only stunning to look at but also very liveable – and while the rooms are classically arranged, there is nothing precious about the house at all except of course, for their gorgeous Labradors who kept me company! Spiced Aubergine Wedges | Selma's TableIn their fabulous kitchen, antique blue and white Spode plates jostle for position on the open shelving with contemporary blue and white bowls and mugs; bone and silver cutlery is stored in earthenware jars, fruit and vegetables are displayed in blue and white bowls on the island and silver and glass cloches are in constant use to cover food which has been prepared. Mixing old and new, marble and wood – the kitchen is just such joy to work in. Spiced Aubergine Wedges | Selma's Table
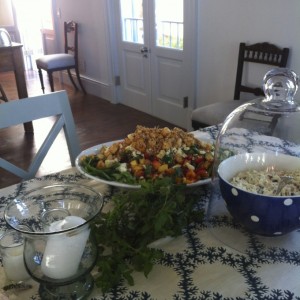
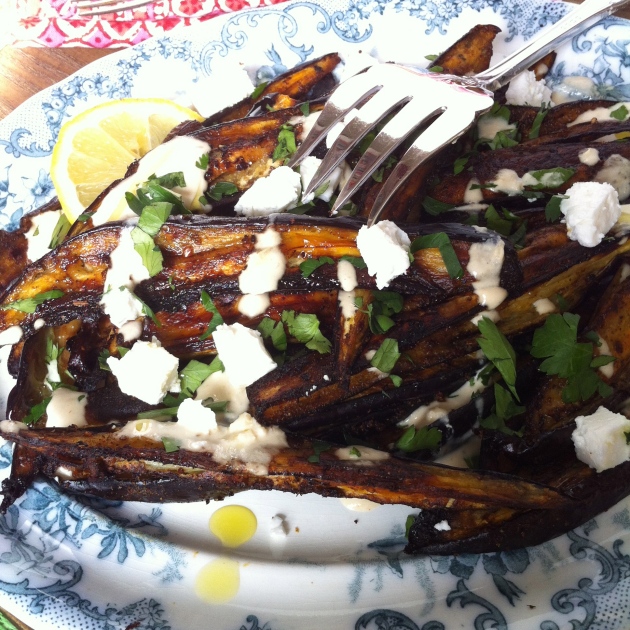
The evening before the wedding, they had planned to host a “casual” braai (barbecue). We had all had all been to a cocktail party the night before, at the grooms’ (also stunning) house and some of us were feeling a little fragile! Nonetheless, that morning, Justin went off shopping, coming back with bags full of fresh produce, tender beef and cases of bubbles. Jake was arriving that afternoon, flying out straight after finishing his last mock exam and had to be collected. On the way to the airport we discussed the menu and what had to be done. Traffic was horrendous which meant we were running a little late and Justin had some work to do when we got back, so I assumed the role of sous chef and set about chopping ingredients for a salad and marinating the beef for the barbecue.

That evening, the table was covered in a stunning trellis patterned cloth; the centrepiece was a trio of coral Himalayan salt candles surrounded with a swathe of fresh mint from the garden.  Plates and napkins were piled up and salads were laid out under the cloches. Huge wooden platters with bowls of nibbles and cheese circulated around the pool where we mingled before the meal and watched another spectacular sunset over the South Atlantic.

While I was sous-cheffing, I found a pile of glossy, purple aubergines which were to be turned into ‘chips‘. Further enquiry led to the clarification that chips meant wedges, so I tossed them in a spice mix I found int the larder and they were roasted in the oven that evening. The leftovers were sprinkled with feta and parsley and served at room temperature with houmous and were absolutely delicious. Spiced Aubergine Wedges | Selma's TableI couldn’t wait to re-create this when I got back. Chermoula is a North African spice blend consisting of ground cumin and coriander seeds, sumac, chilli, paprika, salt and pepper. It is mixed into a paste with lemon juice, olive oil, garlic and coriander before slathering over meat and fish. You can make your own or buy it ready mixed. Google is your best bet! Spiced Aubergine Wedges | Selma's TableI use the chermoula as a dry rub, coating the aubergine wedges after tossing them in olive oil. The wedges are roasted, turning them over halfway through the cooking time and roasting until the edges are crispy and the thicker bits are soft and squidgy. It’s that wonderful combination of flavours and textures; soft and  crispy with a nutty, smokey, tart and salty flavour with the freshness of the chopped parsley and coriander leaves. Delicious with barbecues, as a side to roast lamb or chicken or as part of a mezze.

I am taking this over to Angie’s Fiesta Friday #59 which this week is being co-hosted by the lovely, bubbly Jhuls @ The Not So Creative Cook and  the fabulous Mila @ milkandbun. If you are new to blogging, please do join the party, we would love to see you. Fiesta Friday is a great way to gain exposure and make new friends too. Be sure to comment, like and follow – Angie has such a friendly crowd at this party that you will come away with lots of new followers (as long as you interact) as well as a lot of inspiration! Submit a post (please be sure to include the link and a mention, in your post, to Angie’s   Fiesta Friday #59 post – it’s only polite and also ensures that you can be considered for a feature next week!)  or just take a look at others are up to! If you’re new to Fiesta Friday, please do take a minute to read the guidelines.

Chermoula Spiced Aubergine Wedges with Tahini Sauce and Feta

  • Servings: 4 side servings
  • Difficulty: easy
  • Print

INGREDIENTS

  • 2 aubergines (eggplants)
  • 2 tsp chermoula dry spice blend
  • 2-3 Tbsp olive oil
  • a good pinch of salt
  • 2 Tbsp tahini
  • 1 clove of garlic, crushed
  • 1 lemon halved and one of the halves, sliced into wedges
  • water to thin
  • 50 g feta
  • 1 Tbsp chopped parsley and coriander leaves
  • olive oil to drizzle.

INSTRUCTIONS

  1. Pre-heat oven to 180C/350F
  2. Slice the aubergines into 12 – 16 wedges each, depending on their size.
  3. Toss wedges in olive oil then sprinkle over the chermoula spice mix and a god pinch of salt and toss again. I do all of this on the baking sheet.
  4. Roast for 20 – 25 minutes, turning them over once, half way. They should be golden, cooked through and a little crispy at the edges.
  5. In the meantime, mix the tahini with the juice of half a lemon which will make it very think. Stir in a little water at a time to get it to a good drizzling consistency and then stir in the garlic and set aside.
  6. Crumble the feta and chop the parsley.
  7. Place the wedges in a serving platter, drizzle with tahini mix and scatter over the feta and parsley. Drizzle over a little olive oil and serve with lemon wedges.

You can omit the tahini and serve these with a scoop of houmous instead.

© Selma Jeevanjee and Selma’s Table, 2015. Unauthorised use and/or duplication of this material, including photographs without express and written permission from this blog’s author and/or owner is strictly prohibited. Excerpts and links may be used, provided that full and clear credit is given to Selma Jeevanjee and Selma’s Table with appropriate and specific direction to the original content.

Fruit and Nut Sourdough Crackers

Cape Town
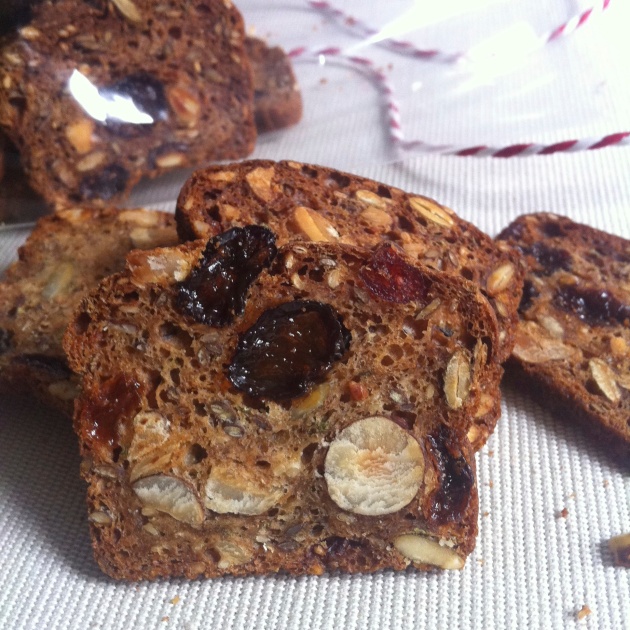
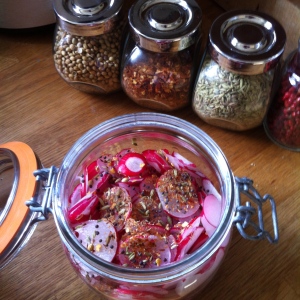
Hello from gorgeous Cape Town! I’m here for a wedding but wanted to share these fabulous crackers with you.

Fruit and Nut Sourdough Crackers | Selma's Table
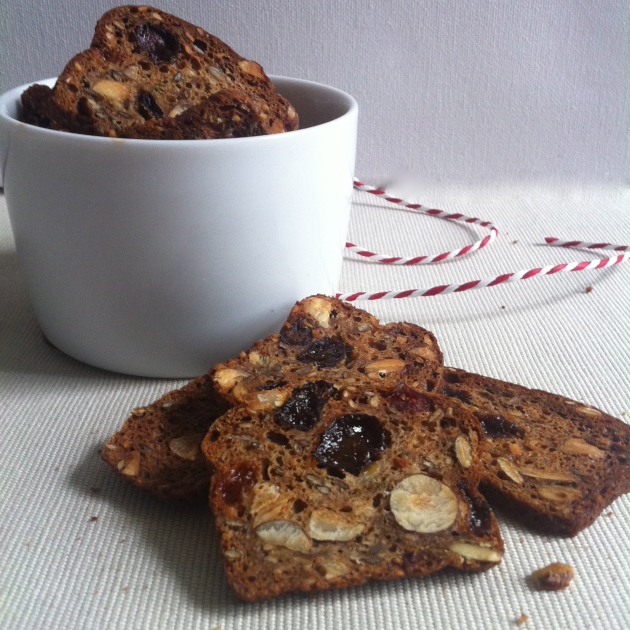
Whenever I dry any sourdough starter, I always test some before sending it out or storing it. This recipe is just perfect for using up the test batch as it makes about a cup.

Fruit and Nut Sourdough Crackers | Selma's Table

Rehydrated sourdough starter

The artisan crackers are just delicious – on their own or with cheese and also make the most gorgeous gift too.

Fruit and Nut Sourdough Crackers | Selma's TableFruit and Nut Sourdough Crackers | Selma's TableFruit and Nut Sourdough Crackers | Selma's Table
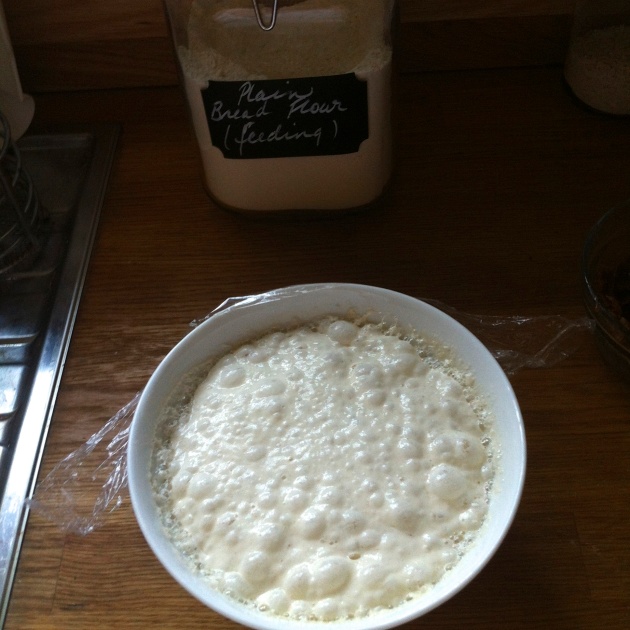
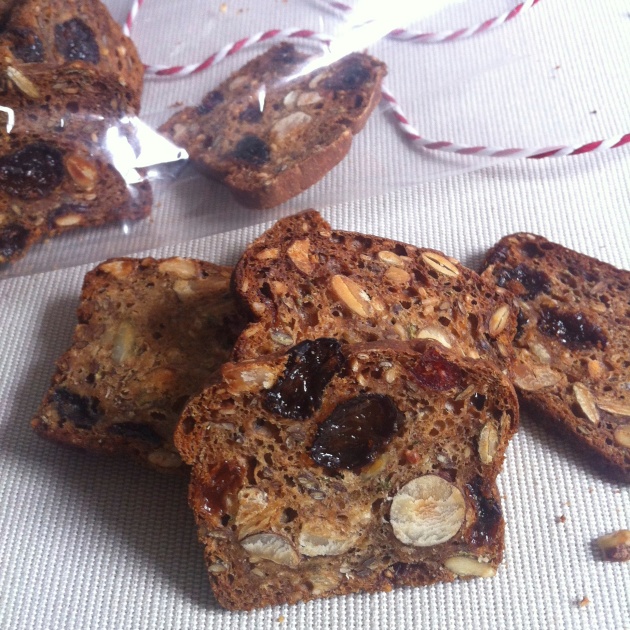
Make sure to pre soak the dried fruit before starting. I used water but next time I will soak them in strong black tea or port.

Fruit and Nut Sourdough Crackers | Selma's Table

Rosemary, Dried Fruit and Nut Sourdough Crackers

  • Servings: about 100/125 crackers
  • Difficulty: easy
  • Print

Adapted from Dinner with Julie

INGREDIENTS

  • 80 g plain/AP flour
  • 70 g wholemeal flour
  • 80 g rye flour
  • 90 g soft brown sugar
  • 1 tsp. baking soda
  • 1 tsp. salt
  • 1 cup recently fed sourdough starter
  • 200 ml milk
  • 100 ml greek yoghurt
  • 1/4 cup honey
  • 1 cup dried fruit – I used berries, cherries and raisins, soaked and drained
  • 50 g chopped almonds
  • 50 g chopped hazelnuts
  • 40 g pumpkin seeds
  • 30 g sesame seeds
  • 40 g linseeds
  • 2 Tbsp/7g chopped fresh rosemary needles

1 x 6 mini loaf tin. Each one of mine measures 11.5 cm long, 6 cm wide and 3.5 cm deep.

INSTRUCTIONS

  1. Preheat oven to 180°C/350°F.
  2. In a large bowl, whisk together the flours, sugar, baking soda and salt to evenly distribute all the ingredients.
  3.  Then, add the starter, milk, the yoghurt and honey and using wooden spoon, mix well.
  4. Stir in the raisins, the nuts, pumpkin seeds, sesame seeds, linseeds and rosemary.
  5. Pour the batter into .
  6. Divide the batter evenly between 8 mini  4″ x 2 1/2″ loaf pans that have been well sprayed with nonstick spray.
  7. Bake 25 – 30 minutes, until the tops have domed and turned golden-brown, and a toothpick inserted into the middle of the cakes comes out clean. Cool for 5 minutes then turn out to cool on wire racks. You can slice  when cold but they slice more thinly when frozen.
  8. Freeze when cold and leave 15 mins or so at room temperature to soften slightly.
  9. Pre-heat oven to 150°C/300° F
  10. Slice one loaf as thinly as you can using a serrated knife and place the slices in a single layer on an ungreased baking sheet.
  11. Bake the crackers for about 15 minutes, then flip them over and bake for another 5-10 minutes, until crisp and brown. Repeat with the remaining loaves, as you need them.
  12. Store in an airtight container and try not to eat them all at once!
© Selma Jeevanjee and Selma’s Table, 2015. Unauthorised use and/or duplication of this material, including photographs without express and written permission from this blog’s author and/or owner is strictly prohibited. Excerpts and links may be used, provided that full and clear credit is given to Selma Jeevanjee and Selma’s Table with appropriate and specific direction to the original content.

Romanesco and Feta Cakes with Za’atar

Romanesco and Feta Cakes with Za'atar | Selma's Table
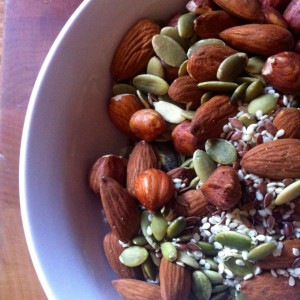
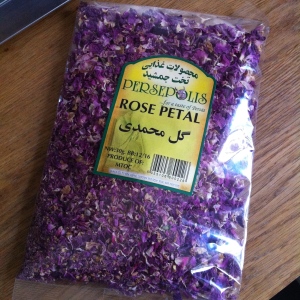
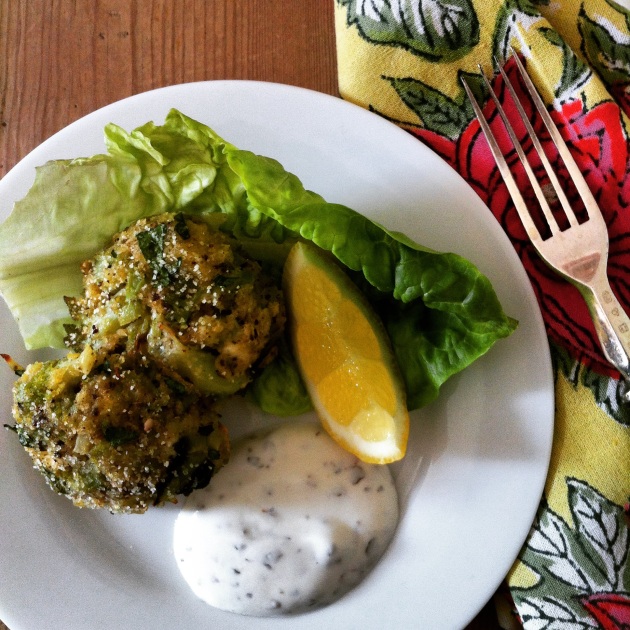
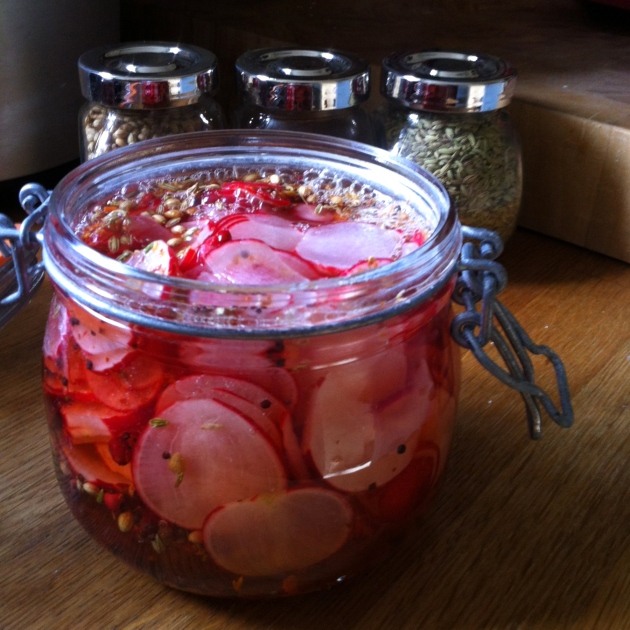
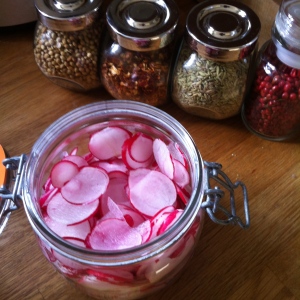
One of the few benefits of globalisation is the exposure and the availability we now have to a huge variety of fruits and vegetables. In England, garlic, which was once regarded as foreign muck is now as ubiquitous as the humble spud. Blood oranges, native to Italy are now cultivated and eagerly anticipated worldwide. When we moved to Canada in the mid ’70’s coriander leaves were scarce and an exotic luxury – my mother would use them parsimoniously out of necessity. Today, sheaves of them can be bought in the grocery stores. It is easier than ever to eat a huge variety of fruits and vegetables which has so many knock on benefits.

Romanesco and Feta Cakes with Za'atar | Selma's TableI can’t remember when I first saw my first romanesco broccoli (aka romanesque cauliflower) but it was a stunningly beautiful if strange, otherworldly looking vegetable that once brought home, I could not bear to destroy by cooking! Cultivated in Italy since the 15th/16th century, this is another vegetable that is now easily available to us. It has a the nutty, buttery flavour of the more familiar broccoli and cauliflower but without the bitter edge that cauliflower can sometimes have and is much preferred by children for that very reason.  I love the florets in a cauliflower cheese, or pureed to go with a roast or roasted themselves, but these cute little cakes another way to have them that doesn’t take long and can also be assembled ahead of time if necessary. The feta gives them a salty creamy kick and the za’atar picks out the lemony flavours. A hint of earthy, aromatic rosemary pulls it all together.

After steaming the florets, just mix the ingredients together, shape into little patties and bake – what could be easier?

Romanesco and Feta Cakes with Za'atar | Selma's TableI am sharing these with those die-hard party goers at Fiesta Friday, hosted by the talented Angie of The Novice Gardener. This week we have  Suzanne @apuginthekitchen and Sue @birgerbird to thank, as our co-hosts. Both are fantastic cooks and have a wealth of recipes on their sites – do go over and take a look.

If you blog, please do join in, reading the the guidelines first to get you going.

R e a d e r   G i v e a w a y!

Ruby Chard, Shitake Mushroom & Chestnut Tart | Selma's Table
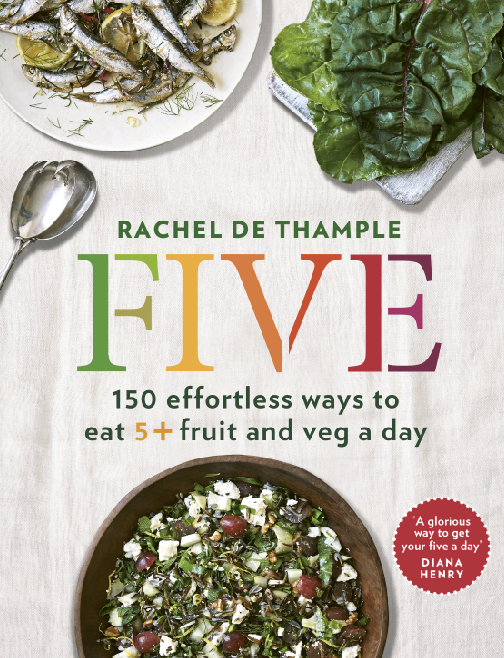
Win a copy of FIVE by Rachel de Thample!

Ever since my son, Jake, began weaning, I have instinctively incorporated more fruits and vegetables into our diet. I always make sure to include at least three fruits/vegetables at meals – usually more if I can. For instance yesterday we had a stir fry of shredded white cabbage, cavalo nero, ruby chard, kale tops, leeks and red onion with some salmon. This is why Rachel de Thample latest recipe book called FIVE which I reviewed last week, appeals so much to me. it shows you how easy it is to eat well and deliciously.  It is full of varied, accessible and delicious recipes that will have you packing away fruits and vegetables without any effort at all. There is a very useful double page spread listing fruits and vegetables and their portion sizes and the recipes clearly state how many portions are in each recipe. And the recipes! There isn’t a single one which I wouldn’t make – from creative breakfast truffles and clever muffins to galettes, latkes, stunning salads, hearty soups, curries, pastries, cakes, puddings, sorbets – and I have one copy to give away to a lucky reader!

All you have to do is follow this blog via email (if you don’t already) and leave a comment below telling me what one of your favourite vegetable dishes is – one of my favourites is  griddled courgette/zuchinni slices, tossed with basil or mint, lemon zest, olive oil, parmesan and toasted almond slivers – so delicious!

Now on to the recipe –

Romanesco and Feta Cakes with Za'atar

  • Servings: makes about 9 small cakes
  • Difficulty: easy
  • Print

INGREDIENTS

  • 1 small romanesco cauliflower ( approx. 175 g prepared weight) or substitute broccoli or cauliflower
  • 75 g feta cheese
  • 20 g panko or bread crumbs
  • zest of half a lemon
  • ½ tsp finely chopped rosemary needles
  • ½ tsp vegetable bouillon powder or a good pinch of salt (remembering that the feta is salty)
  • 1 Tbsp finely chopped parsley
  • 1 Tbsp za’atar
  • 1 egg, lightly beaten
  • 1 tsp fine semolina

INSTRUCTIONS

  1. Preheat the oven to 180C/350F
  2. Break up the romanesco into fairly small florets and steam for about 8 minutes. A knife should be able to pierce them easily but they should not disintegrate. Allow to cool a little.
  3. In the meantime, crumble or chop the feta in small cubes,
  4. When the romanesco is cool enough to handle, mix in the remaining ingredients.
  5. Taking walnut sized pieces of the mix, squeeze and shape into balls. Wetting your hands makes them easier to shape.
  6. Lightly oil a baking tray and place the balls on the tray, Flatten them slightly and then drizzle over a little oil. Dust with semolina, Turn over and repeat.
  7. Bake for 10-12 minutes until tinged with gold.
  8. Serve warm with a dollop of lemony creme fraiche or greek yoghurt.
© Selma Jeevanjee and Selma’s Table, 2015. Unauthorised use and/or duplication of this material, including photographs without express and written permission from this blog’s author and/or owner is strictly prohibited. Excerpts and links may be used, provided that full and clear credit is given to Selma Jeevanjee and Selma’s Table with appropriate and specific direction to the original content.

Ruby Chard, Shitake Mushroom & Chestnut Tart

Ruby Chard, Shitake Mushroom & Chestnut Tart | Selma's TableRachel de Thample is a woman after my own heart. A food writer, forager and advocate for seasonal and local produce, she has worked in the kitchens of Marco Pierre White, Peter Gordon and Hester Blumenthal. She was  Commissioning Editor for Waitrose Food Illustrated, contributed to two Borough Market cookbooks and wrote a fabulous book called Less Meat, More Veg a few years ago. Did I mention that she is also a fellow South Londoner? Ruby Chard, Shitake Mushroom & Chestnut Tart | Selma's TableRachel is the Food Editor for one of the pioneers of the UK organic veg box schemes, Abel & Cole. She writes the most delicious, weekly seasonal recipes for them and also meets with food buyers to look at the ethical aspects of sourcing food.  Her second book, called FIVE has just been published. It is full of varied, accessible and delicious recipes that will have you packing away fruits and vegetables without any effort at all. There is a very useful double page spread listing fruits and vegetables and their portion sizes and the recipes clearly state how many portions are in each recipe. And the recipes! There isn’t a single one which I wouldn’t make – from creative breakfast truffles and clever muffins to galettes, latkes, stunning salads, hearty soups, curries, pastries, cakes, puddings, sorbets…mouthwatering and while heavy on the fruit and vegetables, there are recipes which include fish and meat. Ruby Chard, Shitake Mushroom & Chestnut Tart | Selma's TableI have a copy of FIVE to give away to a lucky reader which I will tell you about in another post but in the meantime just get your tastebuds going with some of these recipe titles – Mexican Roast Pumpkin Soup with Lime; Lemony Scrambled Eggs with Indian Spiced Spinach and Mushrooms; Sassy Cherry and Watercress Salad with Crushed Pistachios; Athenian Rissoles with Pavlos’ Sauce; Summer Veg Patch Gumbo with Chorizo and Crab; Honeyed Aubergine, Feta and Walnut Borek; Honey Blossom Peaches; Mulled Figs with Mascarpone…doesn’t it all sound delicious? Ruby Chard, Shitake Mushroom & Chestnut Tart | Selma's TableIn the meantime, inspired by the premise of the book and my complimentary Able and Cole veg box as well as my Sutton Community Farm veg box, I came up with a recipe which I hope Ms De Thample would approve of!

It is full of seasonal ingredients like ruby chard, mushrooms, leeks  and one of my favourite winter ingredients – chestnuts; gently sautéed together with celery, garlic and thyme and a little lemon to sharpen the flavours, spread onto flakey puff pastry and topped with Barber’s delicious cheddar cheese.

My recipe has been featured over on the Happy Foodie website along with four other bloggers – take a look at what they have to say and what they made here – http://thehappyfoodie.co.uk/articles/number-five-challenge

Ruby Chard, Mushroom & Chestnut Tart

  • Servings: 4 - 6
  • Difficulty: easy
  • Print

INGREDIENTS

  • Bunch of ruby chard or swiss chard or spinach (approximately 250g)
  • 1 Tbsp Olive Oil
  • 1 medium red onion
  • 1 punnet shitake mushrooms
  • juice of half a lemon
  • 2 sticks of celery
  • 1 leek
  • 2 cloves garlic
  • 75g vacuum packed cooked chestnuts
  • 2 Tbsp fresh thyme leaves
  • 1 tbsp finely chopped parsley
  • 1 tsp vegetable stock powder ilke Essentials or Marigold
  • 1 good handful of grated Barbers Vintage Reserve Cheddar Cheese
  • 1 x 320 g sheet of ready rolled, all butter puff pastry
  • 2 eggs beaten with a tablespoon of milk

INSTRUCTIONS

  1. Fill the sink with cold water and swish the chard around in it to loosen any soil. Leave the chard in the water to let any grit settle on the bottom of the sink. Carefully lift the chard out of the water, without disturbing the sediment on the bottom of the sink and gently shake off the excess water. Trim off the ends and cut out the stalks. Slice the stalks, on the diagonal into 3 cm pieces. Slice the leaves into wide ribbons. Keep them separate.
  2. Heat the oil in a large frying pan. Dice the onions and slice the mushrooms and add these to the hot oil. Sprinkle with a little salt, squeeze over the juice of half a lemon then stir and cook until the onions are soft, floppy and golden and the mushrooms have caramelised. You may need to add a little more oil if the mushrooms soak it all up.
  3. While this is going on, finely dice the celery and and slice the leeks into 1 cm rings; coarsely chop the chestnuts – add to the pan with the chard stems and stir. Cook for 3 or 4 minutes.
  4. Finely chop the garlic and add to the pan along with the chard and thyme leaves. Stir and cook for a couple of minutes or until the chard has wilted.
  5. Sprinkle over the stock powder and add a splash of water – just enough to deglaze any caramelisation on the bottom of the pan and get everything nice and juicy but not wet! Turn the heat right down and let this simmer for a minute or two. Taste and adjust the seasoning. Turn off the heat, stir in the parsley and set aside to cool for 10 minutes.
  6. Preheat the oven to 200C/400F.
  7. Unroll the pastry and score a 2 cm border around the perimeter. Transfer onto a parchment lined baking sheet/tray.
  8. Place the cooled chard mixture within the border and scatter over the grated cheddar cheese.
  9. Brush the edges of the tart with the beaten eggs and then gently drizzle the remainder of the egg mixture over the tart.
  10. Bake for 25-30 minutes and allow to cool a little before serving.

Eat warm or at room temperature. Serves 4 as a light main course with a salad and some cold cuts for the determined carnivores. Or slice into 12 and serve  as part of a mezze for 6.

© Selma Jeevanjee and Selma’s Table, 2015. Unauthorised use and/or duplication of this material, including photographs without express and written permission from this blog’s author and/or owner is strictly prohibited. Excerpts and links may be used, provided that full and clear credit is given to Selma Jeevanjee and Selma’s Table with appropriate and specific direction to the original content.

Poached Saffron and Citrus Pears with Vanilla Mascarpone

Poached Saffron and Citrus Pears with Vanilla Mascarpone | Selma's TableIt’s Part 2 of the Fiesta Friday Anniversary Block Party Celebrations which I am thrilled to be co-hosting with the talented Nancy of Feasting with Friends. If you are a long time reader, you will know that the lovely Angie of The Novice Gardener hosts a virtual party every Friday where bloggers swap recipes and stories. It’s been a whole year since Angie grew the amazing community that is Fiesta Friday so it was only fitting to celebrate with a 2 week long party!  Last week was all about cocktails, canapés and appetisers – and there certainly was no dearth of creative and delicious recipes made specially to celebrate Angie’s fabulous party by the appreciative Fiesta Friday crowd. In fact the submissions were just so fabulous that Angie is going to write a post specifically to highlight the best ones.

This week, Fiesta Friday is about special occasion main courses and desserts and I can’t wait to see what everyone brings to the party. You are most welcome if this is your first time visiting  Fiesta Friday – here are a few guidelines to get you started. To join the party, all you have to do is click on the purple “Fiesta Friday” badge just before the printable recipe, below. Please don’t be shy and drop and dash – we would love to get you know you, so mix and mingle by visiting the other blogs and leaving some likes and comments!

Poached Saffron and Citrus Pears with Vanilla Mascarpone | Selma's TableTo mark this special event, this week I wanted to make something that would look elegant, taste spectacular but also not be too heavy. After cocktails, canapés, appetisers and a main course there may not be much room for a heavy dessert. And, not that I am greedy or anything, but I will want a few slivers of cheese to round off this special meal! So the ingredients had to be light but luxurious and to fit in with busy lifestyles, the dessert should be able to be made a day earlier. Pears have been calling my name for a few months now – I have a real thing for them in the winter and I love poached pears. So I decided to poach the in a orange and lemon juice mixture, warmed up by bay leaves, cardamoms and the haunting flavour of saffron. A little honey took the edge off the sauce. The mascarpone tastes just like vanilla ice-cream when a little vanilla paste is beaten into it, and the crunchy pistachio nuts add a much need crunchy texture to each blissful mouthful.

Poached Saffron and Citrus Pears with Vanilla Mascarpone | Selma's TableThese Poached Pears with Saffron Mascarpone are an elegant sweet course that can be served warm or cold depending on the weather and your time constraints. Either way, they can be prepared the day before and plated just before serving. Gently heat through the pears in the poaching syrup if you are serving this warm and then plate them up. To make this an even more healthy option, substitute greek yoghurt for the mascarpone. If you don’t want to fan slice the pears, then you could just cut the in quarters too. They are very easy to make and to eat! Angie has opened the party so let’s the festivities begin!

Poached Saffron and Citrus Pears with Vanilla Mascarpone | Selma's Table

Please click on the Fiesta Friday badge below, to either take a look at all the other submissions or to enter your specially created main course or dessert recipe post to the party.

fiesta-friday-badge-button-click-to-join1

Poached Saffron and Citrus Pears with Vanilla Mascarpone

  • Servings: 4
  • Difficulty: easy
  • Print

INGREDIENTS

  • 4 x oranges
  • 4 x lemons
  • 400 ml sweet dessert wine
  • 3 bruised cardamom pods –
  • 4 bay leaves
  • pinch of saffron strands
  • 3 Tbsp honey
  • 4 ripe Conference pears
  • 200 g mascarpone cheese
  • 1 tsp vanilla paste or the seeds from one pod
  • 2 Tbsp chopped pistachio nuts

INSTRUCTIONS

  1. Juice the oranges and lemons – the juices should come to about 700ml and pour into a large shallow pan together with the sweet wine, cardamom, bay leaves and the saffron. Heat gently for 20 minutes or so – don’t let it boil as the froth spoils the appearance of the sauce. Stir in the honey and taste – the honey should soften the sharp citrus notes. Let this heat for another 10 minutes or until the mixture is nice and syrupy but not too thick.
  2. In the mean time, peel the pears and slice in half. Remove the cores with a teaspoon. Lay each half, face down and slice 4 or 5 times without going all the way to the top.
  3. Beat the mascarpone with the vanilla paste until it is smooth and set aside.
  4. Add the pears to the pan and poach for 5-10 minutes; spooning the syrup over them from time to time. The poaching time will depend on how ripe the pears are.
  5. Remove the pears once they are soft and set aside.
  6. The poaching liquid should be thick and syrupy. If it’s not, keep heating it until it reduces but don’t let the liquid boil. Fish out the bay leaves and the cardamom pods.
  7. Spoon some of the sauce onto 4 plates, Top with a good spoonful of the vanilla mascarpone. Drape two pear halves on top of the vanilla mascarpone on each plate and scatter over the chopped pistachios.
© Selma Jeevanjee and Selma’s Table, 2015. Unauthorised use and/or duplication of this material, including photographs without express and written permission from this blog’s author and/or owner is strictly prohibited. Excerpts and links may be used, provided that full and clear credit is given to Selma Jeevanjee and Selma’s Table with appropriate and specific direction to the original content.

Warm Blue Cheese Tartlets with Candied Walnuts

Warm Blue Cheese Tartlets with Candied Walnuts | Selma's TableIt’s hard to believe that a whole year has gone by since Angie dreamt up Fiesta Friday. I remember how she said that she wanted us all to mix and mingle with each other because it was a party. I must admit that I was sceptical – I had tried various linky parties which made me feel like a virtual wallflower – hardly anyone visited, and the few that did, never commented or liked what I shared. So, when Fiesta Friday started, I stood on the sidelines for a few weeks, popping by to see what was going on and couldn’t believe how fabulous Angie’s bash was. People were submitting gorgeous recipes and they were all mingling like mad! The comments were so supportive, encouraging  and some were very funny too. It quickly became apparent that some people were super bubbly and had to be kept away from the sweets – and I am not naming any names here! So, I really pushed the boat out and made a batch of Nutella Espresso Sticky Buns. Well, the WordPress app on my phone didn’t stop pinging all weekend – people were commenting, following my blog and generally doing exactly what should be happening at linky parties. I felt like the fabled swan when Angie featured my post the following week! So Angie, congratulations on such a successful event and a huge thank you for hosting a brilliant party and gathering these lovely bloggers to your fold.

Warm Blue Cheese Tartlets with Candied Walnuts | Selma's TableThese Blue Cheese Tartlets with Candied Walnuts are something that I have been wanting to make for some time. I watched one of the contestants on Masterchef making something similar with roasted tomatoes and basil oil and the idea of an individual savoury cheesecake really made an impression on me. Also, I bought half a dozen cute little fluted tart tins from the dollar store in Winnipeg when I was there last and keep looking for an excuse to use them. I thought that walnuts would be a much better flavour match for blue cheese so dressed my tarts with the candied walnuts and the walnut dressing.

Making a “crust” with buttery bread crumbs couldn’t be easier and the cheesecake filling comes together so easily with a little whizz in the food processor.

Warm Blue Cheese Tartlets with Candied Walnuts | Selma's TableThis recipe is worth it just for the candied walnuts alone – you will not be able to stop eating them so I suggest you make twice as many. Just sayin’.

Warm Blue Cheese Tartlets with Candied Walnuts | Selma's TableThe tarts are gorgeous – the rich cheese filling with the crispy, crumbly breadcrumb crust, the peppery rocket leaves and the sharp nutty dressing topped off with the sweet and slightly spicy crunchy walnuts – perfect dinner party fodder if you ask me!

I am taking this over to Angie’s Fiesta Friday Anniversary Part 1 which this special week is being co-hosted by my two of my favourite Canadian bloggers,  Hilda @Along The Grapevine and Julianna @Foodie On Board – the original two co-hosts for the first few Fiesta Fridays.

If you are new to blogging, please do join the party, we would love to see you. Fiesta Friday is a great way to gain exposure and make new friends too. Be sure to comment, like and follow – Angie has such a friendly crowd at this party that you will come away with lots of new followers (as long as you interact) as well as a lot of inspiration! Submit a post (please be sure to include the link and a mention, in your post, to Angie’s Fiesta Friday Anniversary Part 1 post – it’s only polite and also ensures that you can be considered for a feature next week!)  or just take a look at others are up to! If you’re new to Fiesta Friday, please read the Fiesta Friday guidelines and invitation post for helpful hints.

It’s been my great pleasure to co-host Fiesta Friday several times and I am so honoured that Angie has asked me to co-host  the Fiesta Friday Anniversary Part 2 with  Nancy @ Feasting With Friends next week. The theme is mains and puddings/sweets next week, so best wear loose clothing! Jhuls, I will bring lots of camomile tea with me! I look forward to seeing what you lovely people bring this week and next. Happy Anniversary Fiesta Friday!

Blue Cheese Tartlets with Candied Walnuts

  • Servings: 4
  • Difficulty: easy
  • Print

Inspired by MasterChef

INGREDIENTS

For the Candied Walnuts

  • 150 g of walnut halves or pieces
  • 100 g of caster sugar
  • 15 g butter
  • a few shakes of cayenne pepper

For the Walnut Dressing

  • 1 Tbsp/15 ml white wine/apple cider vinegar
  • pinch of sea salt
  • 1 tsp French mustard
  • 2 Tbsp/30 ml walnut oil
  • 1 Tbsp/15 mi extra virgin olive oil

For the Blue Cheese Tartlets

  • 100 g white bread (trimmed of the crusts)
  • 50 g butter
  • salt and pepper
  • 100g full fat cream cheese
  • 75 g blue cheese
  • 1 egg yolk
  • 1 tsp flour
  • 1 Tbsp double cream/creme fraiche

To serve

  • Rocket leaves

INSTRUCTIONS

For the Candied Walnuts

  1. Place all the ingredients into a nonstick pan and stir over a medium heat.
  2. Keep stirring until the sugar turns to caramel and starts to coat the nuts. This takes between 3 to 5 minutes. Don’t let the caramel burn – just keep stirring it.
  3. Once the caramel is a toffee brown, pour the mixture onto a silicone sheet or parchment paper – be careful as the caramel is very hot – and using a rubber spatula or a wooden spoon, separate the nuts making sure that there is caramel on each one.
  4. Let cool, then store, out of sight, in a lidded jar to avoid eating the whole lot.

For the Walnut Dressing

  1. Place the vinegar and sea salt in a small bowl and whisk to dissolve the salt.
  2. Whisk in the mustard then slowly whisk in the oils. You can also just put the lot in a lidded container and shake hard but I like the rounded airy fullness that whisking gives to a dressing.
  3. Set aside.

For the Blue Cheese Tartlets

  1. Preheat the oven to 190C/375F. Butter/spray the bases and sides of 4 x 8cm/3in fluted, loose bottomed flan tins.
  2. Whizz the bread in a food processor to fine crumbs. Melt the butter and tip in the crumbs, stirring to combine. Season with a little salt and pepper.
  3. Divide into 4 then press the mixture on the base and up the sides of the prepared tins. Use the back of a teaspoon to even out the base.
  4. Place on a baking sheet and bake for about 10- 12 minutes or until the bases are golden but keep an eye on them as they can catch quite quickly.
  5. Beat the rest of the ingredients together and divide between the tins. I did this in the mini processor in which I whizzed the bread crumbs.
  6. Place on a baking sheet and bake for 10 – 12 minutes or until the tops are golden and just set – a little wobble in the middle is desired.
  7. Cool for a few minutes then remove carefully from the tins.
  8. Serve warm or at room temperature on a few rocket leaves, drizzling the dressing around the plate and garnishing with the candied walnuts.
© Selma Jeevanjee and Selma’s Table, 2013 – 2015. Unauthorised use and/or duplication of this material, including photographs without express and written permission from this blog’s author and/or owner is strictly prohibited. Excerpts and links may be used, provided that full and clear credit is given to Selma Jeevanjee and Selma’s Table with appropriate and specific direction to the original content.

Fruited Cinnamon Sourdough Loaf

Fruited Cinnamon Sourdough Loaf | Selma's TableYou can’t rush sourdough bread making. The physical time spent on making the bread is minimal however the proofing takes time; time to develop the wild yeast and those coveted bubbles, to develop the gluten strands  and  to develop that unique flavour. I like to think of it as nurturing. And it’s so inherently satisfying, almost on a primal level, to be able to produce the staff of life, using ancient methods – made with wild yeast, additive free ingredients and with a pedigree. My starter, Twinkle, comes from Celia’s starter, Priscilla, which is nearly 8 years old.  Since I got my starter from Celia of the fabulous blog Fig Jam and Lime Cordial, last month, I have been baking bread – getting to know and learning how to handle Twinkle just like a would a baby! So it’s all about setting out a time plan starting with when you want to bake or eat the bread and working back from that. I tend to start on a Saturday afternoon, to bake a basic sourdough loaf on the Sunday morning but this Fruited Cinnamon Sourdough Loaf takes a little longer because it goes in the fridge for the yeast and flavours to develop slowly and more fully.

Fruited Cinnamon Sourdough Loaf | Selma's Table
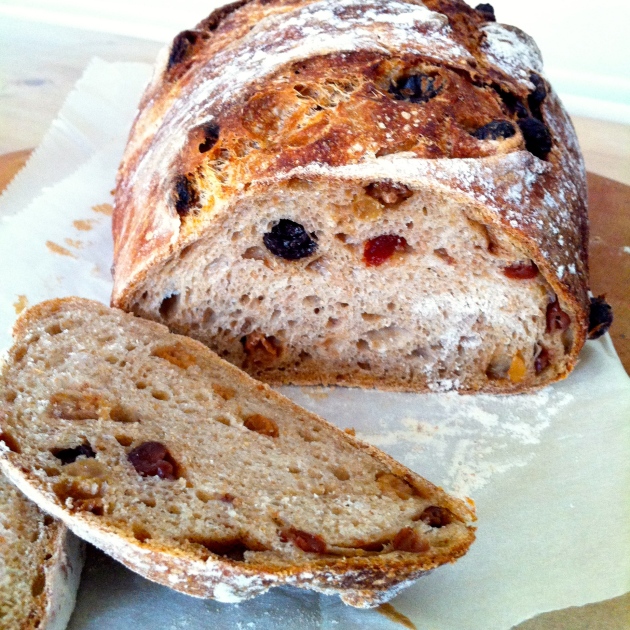
Over on Twitter, there is a small group of us who started baking our Pricilla originated sourdoughs at the same time. Led by Celia, we have the most hilarious, informative and inspiring conversations. This Fruited Cinnamon Sourdough Loaf was inspired by Annie’s efforts and has also led Celia to bake the most gorgeous looking fruit loaf too!  Other people dip in and out of our conversations, commenting, offering advice or asking questions. Oh, and it’s mostly on Australian time so when I’m getting up, they may or may not have had a glass or two!! Fruited Cinnamon Sourdough Loaf | Selma's Table

Start the Fruited Cinnamon Sourdough Loaf a couple of days before you want to bake. I started the process on Friday afternoon and baked the loaf on Sunday morning. The full, printable recipe with some links is below but in a nutshell, this is what I do. I start by feeding Twinkle to make a poolish. Then I add the rest of the ingredients to make the dough and squelch the lot together for a minute. After half an hour, I stretch and fold the dough a few times. This goes into a lightly oiled bowl and sits out on the counter to bulk prove overnight. The next morning, I incorporate the dried fruit using the stretch and fold method, place the dough back in the cleaned and oiled bowl and leave it in the fridge until the next morning. The photo below is what I woke up to! Fruited Cinnamon Sourdough Loaf | Selma's Table 
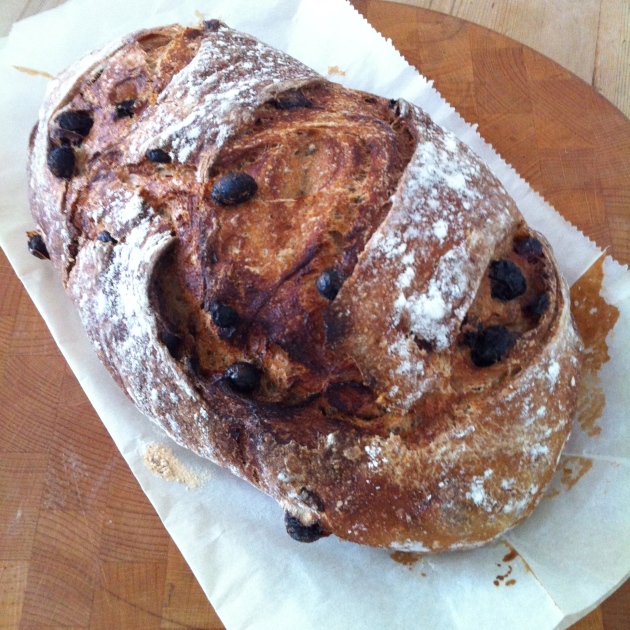
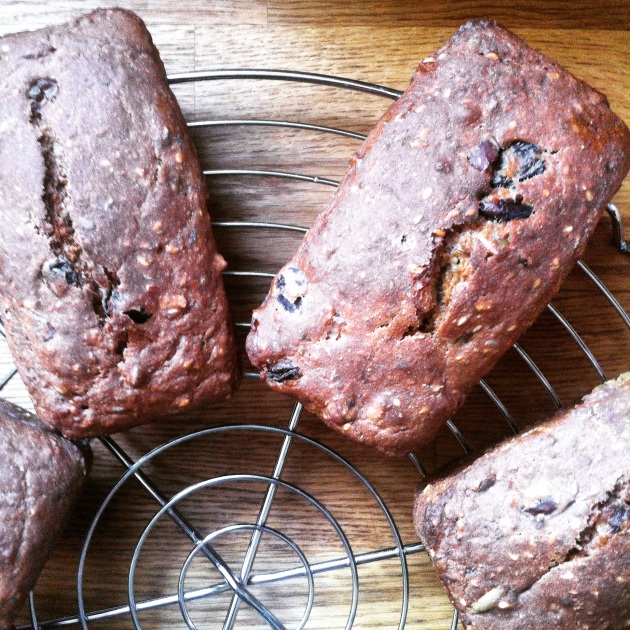
At this point, I incorporate the cinnamon sugar and shape the loaf. This sits out on the counter to proof once more for 30-45 minutes, while the oven heats up and then goes into a lidded casserole dish, gets slashed and bakes for 20 minutes with the lid on. After another 30 minutes with the lid off, this is what it looks like…go on – you know you really want to give this a try! Fruited Cinnamon Sourdough Loaf | Selma's Table If you’ve had starter from Celia or from me, give this Fruited Cinnamon Sourdough Loaf a go once you are comfortable with baking Celia’s Overnight Sourdough.

Some resources – Emilie of the Clever Carrot, who got her starter from Celia a year ago, has this brilliant beginners guide to sourdough on her blog. She has been baking the most gorgeous looking breads – bakery worthy!  The Weekend Bakery have a couple of great videos on how to fold and stretch dough and also how to shape the loaves. I have added the video links to the recipe below, in the appropriate places.

Fruited Cinnamon Sourdough Loaf

  • Servings: 1x approx 750 g loaf
  • Difficulty: moderate
  • Print

For the sourdough poolish

Day 1At 1 pm –  Remove ¼ cup of starter from the fridge and feed her ¼ cup each of bread flour and filtered water, followed by ½ cup of each at about 4pm. By 8pm your poolish will bubbly and ready to incorporate into a dough.

For the fruit soak

Day 1At 8 pm – Soak 200 g dried fruit of your choice – my mix included cherries, cranberries, sultanas and raisins with 100 ml strong hot black tea and leave out overnight. Drain well before using.

For the Fruited Cinnamon Sourdough Loaf

  • 200 g bubbly sourdough poolish
  • 300 – 320g filtered water
  • 250g organic white bread flour
  • 250g organic wholemeal bread flour
  • 9g fine sea salt
  • fruit soak, well drained
  • 1 tsp cinnamon mixed with 2 Tbsp sugar

INSTRUCTIONS

  1. Day 1At about 8 pm – Pop a large mixing bowl on the scales and reset the scales to zero.
  2. Measure in 200g of the poolish and reset the scales to zero.
  3. Pour in 300g of filtered water and reset the scales to zero.
  4. Measure in the flours and the salt.
  5. With a clean hand, squelch everything together for about a minute or so. If it is really dry, add a little more water – wholemeal flour can be very thirsty. Scrape off all the bits on your fingers, into the bowl, cover the bowl with cling film and leave it to rest for ½ an hour. (The first time I made bread, I wanted to protect my manicure and popped on a disposable latex glove to squelch. Not much sticks to the latex so I have carried on using one every time I make a loaf.)
  6. If your bowl is large enough, you can “knead” in it. Otherwise, scrape the dough out onto a lightly floured surface and spread it out a little. Start to stretch the dough (which will be sticky but just persist without adding any extra flour) by pulling it and folding it over on it self. Do this several times until the dough starts feeling a little more elastic. This is called the stretch and fold method.
  7. Clean your large bowl, and lightly oil it and place the dough inside. Cover it with cling film or a shower cap and leave it out overnight. This is called the bulk prove.
  8. Day 2 – The next morning, you will find the the bowl is pretty well full of bubbly dough. Scrape it out again on a lightly floured surface and gently pull and stretch it out into a rough rectangle. Spread with the well drained fruit soak. Fold the dough over it in thirds, (like an A4 letter), then do the same again. Gently stretch it out into a rectangle and repeat the folding once again, as best as possible.
  9. Lightly oil the bowl and place the dough inside. Cover with cling film and put the bowl in the fridge to prove. (Putting it in the fridge, slows down the rise you can leave it in the fridge for a couple of days if you need to.)
  10. Day 3 – The next morning, the dough will be doubled in size and full of bubbles; somewhat resembling an alien life form!
  11. Pre-heat your fan oven to as high as it will go.
  12. Gently scrape the dough out onto a very lightly floured surface, and gently pull into a rectangular shape. Scatter over the cinnamon sugar and fold in thirds, stretch and fold into thirds again.
  13. Shaping the dough – Seam side down, drag and pull the dough towards you, cupping it with your hands and keeping the seam on the bottom, Make a quarter turn and repeat until you have a nice tight gluten coat on the top. I pulled mine into an oval shape as I was doing this. Cover with some oiled cling film and leave out to warm up and rise for 30-45 minutes.
  14. Line a lidded casserole dish with parchment paper and flour the paper. Transfer the dough into the dish and slash the top as you wish – I made 3 diagonal cuts to the top.
  15. Cover the dish and place in the oven. Turn down the heat to 220C fan and bake for 20 minutes.
  16. Remove the lid, turn down the heat to 190C and bake for 30 minutes. Check that the bread is cooked by tapping on the bottom to see if it sounds hollow. Otherwise, put it straight onto the oven rack and bake for 5 more minutes.
  17. I know it’s difficult, but let it cool for at least 30 minutes before slicing into it!

You can of course bake this on a pizza stone or on a baking sheet. If you do, put a few ice cubes or some water into a muffin tin or small tin and place on the floor of the oven to generate steam.

© Selma Jeevanjee and Selma’s Table, 2013 – 2015. Unauthorised use and/or duplication of this material, including photographs without express and written permission from this blog’s author and/or owner is strictly prohibited. Excerpts and links may be used, provided that full and clear credit is given to Selma Jeevanjee and Selma’s Table with appropriate and specific direction to the original content.

Almond, Orange and Tahini Biscuits

Almond, Orange and Tahini Biscuits | Selma's TableI was so thrilled when Elaine of foodbod asked me to write a post for her new series, “What would you feed me?” Elaine is the embodiment of healthy eating – she is vegetarian, sugar free, caffeine free and also avoids wheat but doesn’t miss out on any flavour with her punchy Middle East inspired spicing. I discovered her blog when someone re-blogged one of her earliest posts which was for a pavlova – the antithesis of how Elaine eats!  So I set my mind to thinking how I could produce a treat that was true to Elaine’s food ideals. Obviously, it had to have tahini in it – Elaine’s favourite food group!!  Ground almonds to substitute for flour and honey for sugar…I kept thinking about those lovely Chinese Almond Cookies that are made for Chinese New Year. I am rather partial to orange zest and cardamom in baked goods, so in they went too.. Almond, Orange and Tahini Biscuits | Selma's TableThe Almond, Orange and Tahini Biscuits have Elaine’s name written all over them. Wheat free, refined sugar free but chock full of almonds and tahini of course! They are also dairy free and egg free, making them suitable for vegans.  While these do have honey in them they are not very sweet so they won’t kick your sweet cravings into high gear. The orange and cardamom flavours work beautifully with the nutty flavours of the tahini and almonds. The biscuits bake up crispy on the outside and chewy on the inside – just begging to be dunked in a cuppa!  Judging by the response on Instagram, I think that they are a success! Almond, Orange and Tahini Biscuits | Selma's Table If you want to know how to make these ridiculously easy Almond, Orange and Tahini Biscuits please go over to my guest post on Elaine’s blog, foodbod. The post is called, ‘What would you feed me…Selma’ – if you click on the link below, it will take you straight to it. While you are there, take a minute to browse through Elaine’s recipes – you will come away inspired!

https://foodbod.wordpress.com/2015/01/21/what-would-you-feed-me-selma/

 © Selma Jeevanjee and Selma’s Table, 2015. Unauthorised use and/or duplication of this material, including photographs without express and written permission from the author and/or owner is strictly prohibited. Excerpts and links may be used, provided that full and clear credit is given to Selma Jeevanjee and Selma’s Table with appropriate and specific direction to the original content.

Crunchy Pickled Radish Slices

Crunchy Pickled Radish Slices | Selma's Table

After the excesses of festive season, January bears the brunt of cutting back whether it be shopping, alcohol and/or food. The feasting seems to start from the beginning of December so come January, we do crave simpler, lighter food. The trouble is that sometimes it can seem a little bland. These crunchy, pickled radish slices will perk up all sorts of things from salads to steamed vegetables, steamed fish to simply cooked meats. And of course they are superb with cheese and crackers, in sandwiches,  in burgers; anywhere you need a crunchy, spicy, floral, acidic hit of flavour.

They are ridiculously easy to make – combine the spices, slice the radishes and layer in a heatproof jar. Boil the brine to dissolve the sugar and salt and pour over the radishes. That’s it! You can eat them as soon as they have cooled or refrigerate them for later – they keep for a few weeks. I hope you find that they add a little pizzaz to some of your January meals!

I am so thrilled to be co-hosting The Novice Gardner’s Fiesta Friday with the incredibly talented Sue of Birgerbird. If you are not familiar with her work – please do take a look – her photography will blow you away and then when you see the gorgeous award winning food she cooks too – wow! She now sells her award winning pork pies so if you are lucky enough to be in the Santa Monica area, give her a yell! We are co-hosting Angie’s 50th Fiesta Friday and we can’t wait to see what you are bringing to the party!

Click on the Fiesta Friday badge below to join the party – you can submit a post (please be sure to include the link and a mention, in your post, to Angie’s  FF#50 post – it’s only polite and also ensures that you can be considered for a feature next week!)  or just take a look at others are up to!

Speaking of features, there were some stunners last week! I still can’t get over Lily’s Dark Chocolate Cupcakes with White Chocolate Buttercream and Naina’s Firecracker Shrimps look fantastic. And how about a Lemon Meringue Pie Cocktail from Dini to kick things off with? Then for pudding we have Pecan-Bacon Squares A’ La Mode from Judi! Wowsers!!

If you are new to blogging, Fiesta Friday is a great way to gain exposure and make new friends too. Be sure to comment, like and follow – Angie has such a friendly crowd at this party that you will come away with lots of new followers (as long as you interact) as well as a lot of inspiration!

If you’re new to Fiesta Friday, please do take a minute to read the guidelines.

fiesta-friday-badge-button-click-to-join1

Crunchy Pickled Radish Slices

INGREDIENTS

  • 1 bunch of radishes

Brine

  • 200 ml white wine or apple cider vinegar
  • 200 ml water
  • 3Tbsp sugar, honey or maple syrup
  • 2 tsp salt

Spices

  • ½ – 1 tsp chilli flakes depending on how spicy you like it
  • ½ tsp mustard seeds
  • ½ tsp red peppercorns
  • ½ tsp fennel seeds
  • ½ tsp coriander seeds

INSTRUCTIONS

  1. Trim off the tops and tails of the radishes. then, using a sharp knife or a mandolin, slice very finely into rounds.
  2. Mix the spices together and place half in the bottom of a heat proof jar.
  3. Fill the jar with the sliced radishes and top with the remaining spices.
  4. Bring the brine ingredients to a boil, stirring occasionally.
  5. Pour over the radishes and let this cool to room temperature before serving or storing in the fridge.

The radishes will last for a few weeks in the fridge.

© Selma Jeevanjee and Selma’s Table, 2013 – 2015. Unauthorised use and/or duplication of this material, including photographs without express and written permission from this blog’s author and/or owner is strictly prohibited. Excerpts and links may be used, provided that full and clear credit is given to Selma Jeevanjee and Selma’s Table with appropriate and specific direction to the original post.

Smoked Mackerel Pâté Canapés

Smoked Mackerel Pâté Canapés | Selma's TableEveryone needs a quick, easy to make canapé recipe, especially at this time of year. This Smoked Mackerel Pâté takes minutes to whizz up together and is endlessly versatile; it can be spread it on some thin oven toasted slices of baguette, topped it with grated cheese and grilled – super easy and really tasty too. Or, if you don’t want to be bothered with heating them up, you could just top the baguette toasts with the Mackerel Pâté, place half of a pitted black olive and a sprinkle of parsley on top and voila!

Smoked Mackerel Pâté Canapés | Selma's TableIf you are having a buffet style table of nibbles, you can also serve the pâté in a bowl, surrounded by slices of baguette. I’ve often served it as a casual starter when I’ve had friends round for supper during the week. Everyone gathers round the table with a drink, to chat and whet their appetites on this pâté while I get on with finishing off the main attraction.

Smoked Mackerel Pâté Canapés | Selma's Table

My version includes a little heat from chilli flakes and a warm spicy note from dry roasted cumin seeds – both work so well with the smoky mackerel and the sharpness of the lemon. You can change the spicing to suit your palate, of course.

Smoked Mackerel Pâté

  • Difficulty: easy
  • Print

INGREDIENTS

  • 3 fillets (approximately 300 – 350g in total) of smoked and peppered mackerel with the skin removed
  • 1 tsp dry roasted cumin seeds
  • ½ tsp chilli flakes
  • zest and juice of a lemon (unwaxed) Use half the juice to start with and only add more after you have tasted the pâté, if it needs it.
  • 2 Tbsp half fat creme fraiche
  • 2 Tbsp chopped parsley

To Serve

  • Baguette cut into ½ cm slices and toasted on a tray in the oven
  • A little grated cheddar cheese

INSTRUCTIONS

  1. Break the mackerel into large chunks and place all the ingredients (using just half of the lemon juice to start with) into a food processor. Pulse to combine. Try and keep some of the texture rather than reducing it to a homogenous paste.
  2. Taste and adjust seasoning as necessary – you may need more lemon.
  3. Scrape into a container and refrigerate until needed.
  4. Then, turn on the grill/broiler.
  5. Cover the slices of baguettine with the pâté, top with a little grated cheddar and place on a baking sheet. Grill/broil until bubbly and browned.

The Smoked Mackerel Pâté also very nice cold topped with a slice of olive, and as a casual starter with a baguette.

© Selma Jeevanjee and Selma’s Table, 2013, 2014. Unauthorised use and/or duplication of this material, including photographs without express and written permission from this blog’s author and/or owner is strictly prohibited. Excerpts and links may be used, provided that full and clear credit is given to Selma Jeevanjee and Selma’s Table with appropriate and specific direction to the original content.

Sensational Meatballs with Lentils

Sensational Meatballs with LentilsI almost didn’t post this recipe, hence the lack of photos, in progress or otherwise! I’ve been making these Sensational Meatballs and Lentils for about 8 years (since 2006 according to my notes) and it was Jake who suggested that I share the recipe here on the blog when I made it the other day. It came about the usual way – picking up a few bits on the way home from work and seeing what was in the cupboards to supplement the ingredients – a bit like Ready Steady Cook! The resultant deeply flavoured, lemony Meatballs and Lentils were so delicious that I wrote up the recipe in my notebook.

This is one of those dishes that wraps you up in a warm blanket and gives you a hug; so comforting on these dark, chilly evenings. The seasonings of smoked paprika, rosemary and cumin seeds give the dish so much depth and flavour and the lemon juice and zest perk it all up.  It’s very quick to prepare, especially if you buy pre-made (raw) meatballs which can be a godsend if you are strapped for time.  Red lentils don’t require pre-soaking and cook very quickly, usually between 15 – 20 minutes and the lemon juice is the perfect complement to them. Stirring in spinach or chard leaves at the end gives it a vegetal boost with the added bonus of not having to prepare a separate side dish. You could also use frozen spinach. adding it a few minutes earlier so that it has a chance to thaw in the pot. Don’t add salt until the end otherwise the lentils stay hard.  This is quick, one pot cooking at it’s best.

Sensational Meatballs with Lentils
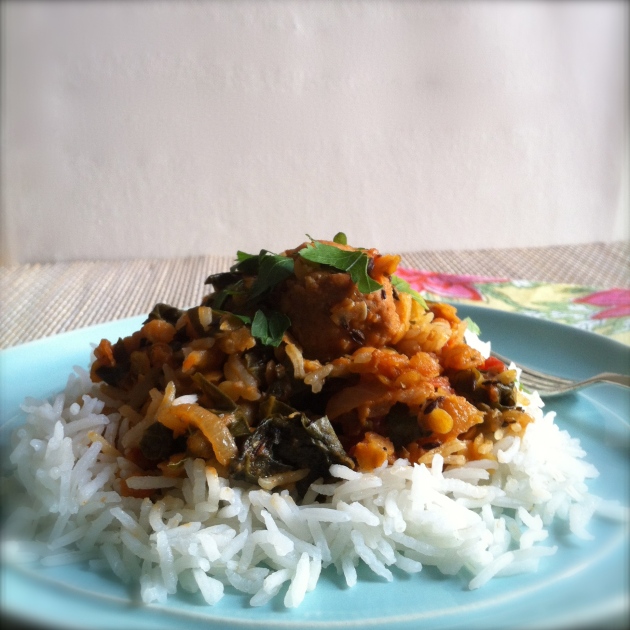
You start by rolling the meatballs, then sauté the onions, then the meatballs with the seasonings; stir in the stock, lentils, lemon juice and tomatoes and let the whole lot simmer away while you get the rice on and prepare the spinach which gets stirred in a couple of minutes before the end. That’s it!! I urge you to give the Meatballs and Lentils  a try – the dish is absolutely sensational!

I’m taking these to share with all the Fiesta Friday #46  revellers, so generously hosted by Angie at the Novice Gardener. Today our co hosts are  Margy @La Petite Casserole and Juju @cookingwithauntjuju. – do drop by and say hello to them!

Sensational Meatballs with Lentils

  • Servings: 4 generous portions
  • Difficulty: easy
  • Print

INGREDIENTS

  • 500 g lean mince beef
  • 1 tsp of salt and a good grinding of the pepper mill
  • 2 Tbsp finely chopped parsley
  • 2 red onions, diced
  • A good splash of Olive oil
  • 1 Tbsp chopped rosemary
  • 1 tsp whole, dry roasted cumin seeds
  • 1 rounded tsp smoked paprika
  • 2 finely chopped garlic cloves
  • Zest and juice of one lemon
  • 200g dry red split lentils
  • 1 rounded tsp of chicken stock powder stirred into 500 ml of hot water/500ml homemade stock
  • 1 tin of tomatoes or 3-4 medium tomatoes, quartered
  • 1 couple of bay leaves
  • 300 – 400 g fresh spinach or chard

To serve

  • Cooked rice
  • Dollop of greek yoghurt or tzatziki

INSTRUCTIONS

  1. Season the minced beef with salt and pepper, stir in parsley and with a light hand, mix well to combine. Wet your hands and roll into walnut sized balls and set aside. If you are in a hurry you can substitute ready made (raw) meatballs but get the premium ones as the cheaper ones have more fat and sometimes, gristle.
  2. Heat the olive oil in a large saucepan and sauté the onions until soft and a little coloured.
  3. Stir in the rosemary, smoked paprika, garlic and lemon zest, then add the meatballs and sauté until lightly brown on all sides – about 5 minutes.
  4. Stir in the lemon juice, the lentils, the stock, the tomatoes (break up the tomatoes if you are using whole tinned ones) and bay leaves. Let this simmer gently for about 20 minutes. Keep an eye on it and add a little more water if necessary. It shouldn’t be too thick.
  5. While it’s simmering away, wash the spinach/chard and remove the central rib if thick and fibrous. Save them in the freezer, for the stock pot. Chop the leaves and set aside. Get the rice on.
  6. After 20 minutes, check that the lentils are cooked through and also check the seasoning. Adjust to taste – this is the time to add salt; I also like to add more cumin seeds.
  7. Stir in the spinach/chard leaves and cover the pot to allow the leaves to wilt in the heat.
  8. Serve hot with rice an a dollop of greek yoghurt or tzatziki.
© Selma Jeevanjee and Selma’s Table, 2013, 2014. Unauthorised use and/or duplication of this material, including photographs without express and written permission from this blog’s author and/or owner is strictly prohibited. Excerpts and links may be used, provided that full and clear credit is given to Selma Jeevanjee and Selma’s Table with appropriate and specific direction to the original content.