Thyme & Seed Pide topped with Leek, Celery & Cheese

thyme-and-seed-pide-with-a-leek-celery-and-goats-cheese-toppingIt’s funny how inspiration strikes. Aware that the clock was counting down fast on the deadline for submitting a ‘yeast and herb’ based post for Angie’s first Fiesta Friday Challenge, I found myself dithering over recipes, like a debutante in a dress shop. I cursorily glanced through some of my bread baking books but nothing appealed. I googled “yeast recipes”; still nothing appealed. In the meantime, fabulous dishes were being submitted; Sue with her fabulous fermented kvas as a base for a Russian soup, Michelle with her luscious peach and basil danishes; Angie herself posted a stunning looking Fougasse…tick, tock, tick tock… Oh, what to do? I pop into my local green grocers to pick up some tomatoes and basil for a salad. Checking my purse, there isn’t enough change to cover it so I pull out my card to pay then realise that there is minimum £5 purchase for card transactions. I had been eyeing up a tray of squidgy Mejool dates, so I added them to the basket as Jake loves them. The next day, I wander into the kitchen to make a coffee, idly thinking about the day ahead when my eyes fall on the dates. I think about flavour combinations and imagine that dates and goats’s cheese would work. A quick internet search shows that I am not alone in thinking this. Progress! I plump for a seeded flatbread by bread maestro, Dan Lepard, to which I will add thyme, make tamarind and date sauce and a topping of leeks & celery. I have a moment’s worry as to this flavour combination, so try a teaspoonful of the leek and celery, topped with a cube of goat’s cheese with a dribble of the date and tamarind sauce. Hurrah!! It is delicious! Sharp, tart, grassy, crunchy, earthy, lemony, spicy – it works!! I will go to the ball, I will! thyme-and-seed-pide-with-a-leek-celery-and-goats-cheese-topping thyme-and-seed-pide-with-a-leek-celery-and-goats-cheese-topping
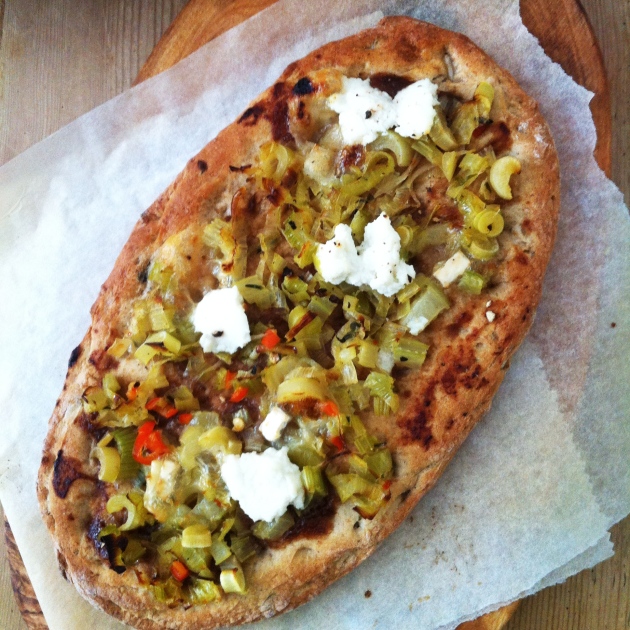
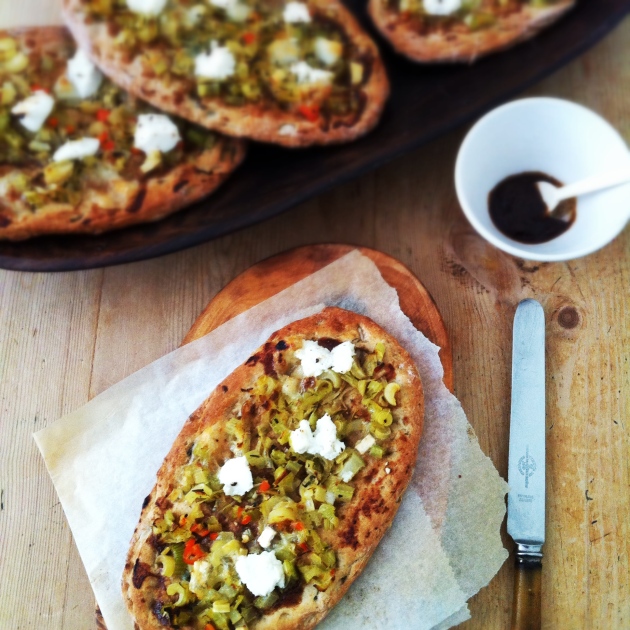
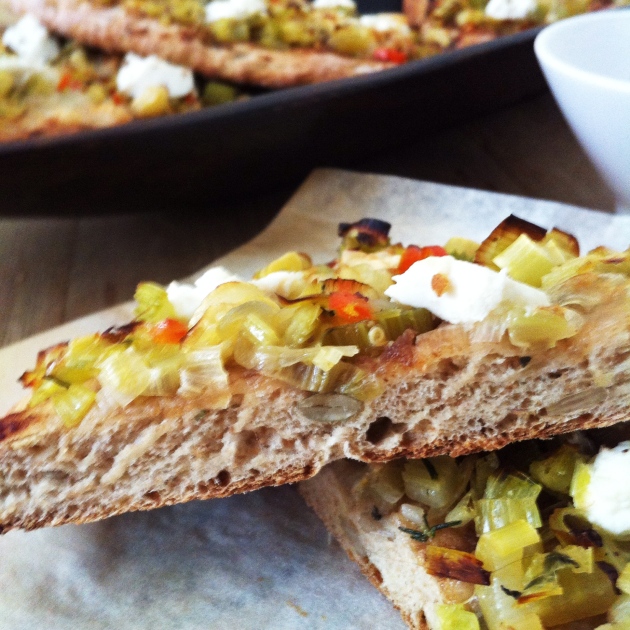
Once baked, the goat’s cheese has melted and the creamy ricotta is a wonderful counterpoint to the heat from the chilli flakes and the crunch of the seeds. Next time I will add more ricotta (I’ve updated the recipe below to account for this). Angie is being very ably assisted by Catherine @ Catherine Cuisine. Please do go and look at the entries for this yeast and herb based challenge; you will find crumpets, semolina pancakes, pizzas, flat breads and  much, much more – the Creative Fiesta Friday Crew are rising beautifully (see what I did there, Angie and Catherine?) to the challenge! So this is how to make some easy and delicious Turkish inspired Pides – feel free to use different toppings but I have to say that I was really pleased with the combination below. As always, a printable recipe follows the photo tutorials and any musings. thyme-and-seed-pide-with-a-leek-celery-and-goats-cheese-topping Ever since I attended Nina Oortman’s bread making class, I have been coveting the stainless steel counters that make bread kneading, shaping and  clean up so effortless. I came across this rather large stainless steel serving/prep  tray from my catering days, while I was unpacking and had a Eureka! moment. Rather than bestowing the tray on my local charity shop, it could come in useful for pasta and dough making – and it has, as you will note from the photos below… thyme-and-seed-pide-with-a-leek-celery-and-goats-cheese-topping 
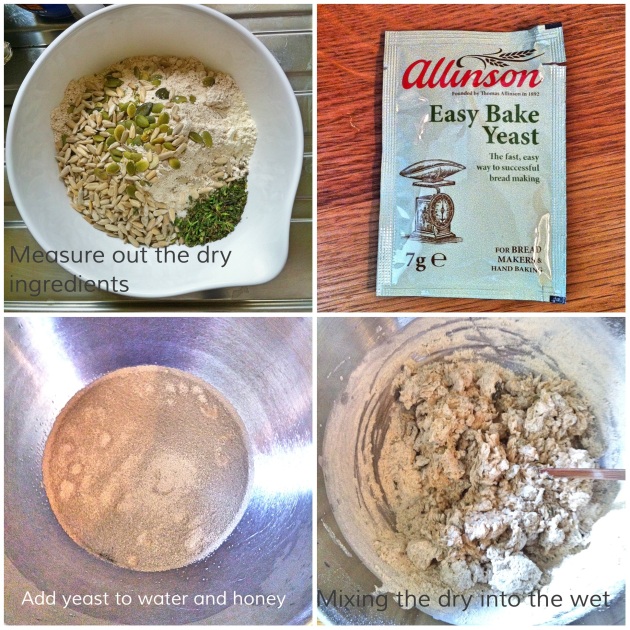
I used a chopstick to roughly mix the dry ingredients into the wet, thanks to a tip from Aneela @ The Odd Pantry and it worked brilliantly. No more sticky dough adhering plaster-like to each finger! The dough is sticky – resist the temptation to add lots of flour when you are working with it. This dough does not require very much handling – hardly any kneading in fact. A light hand and as little additional flour as possible will yield a more tender bread. http://theoddpantry.com/2014/05/07/in-my-kitchen-of-alternative-uses-may-2014/ http://theoddpantry.com/2014/05/07/in-my-kitchen-of-alternative-uses-may-2014/

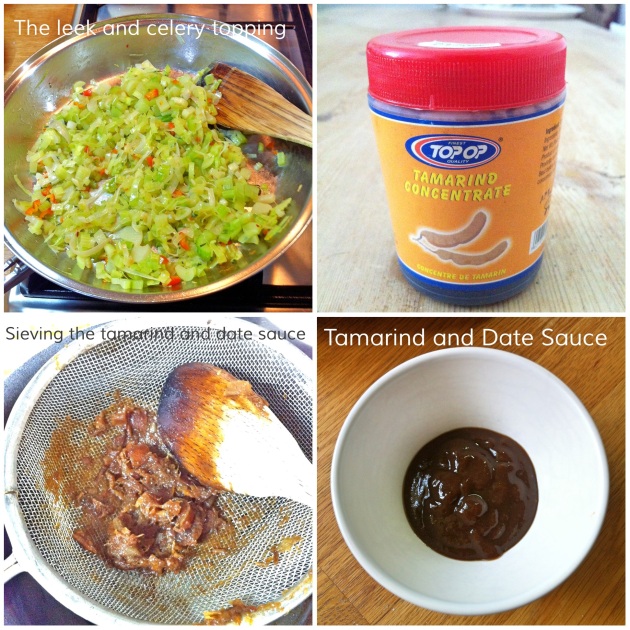
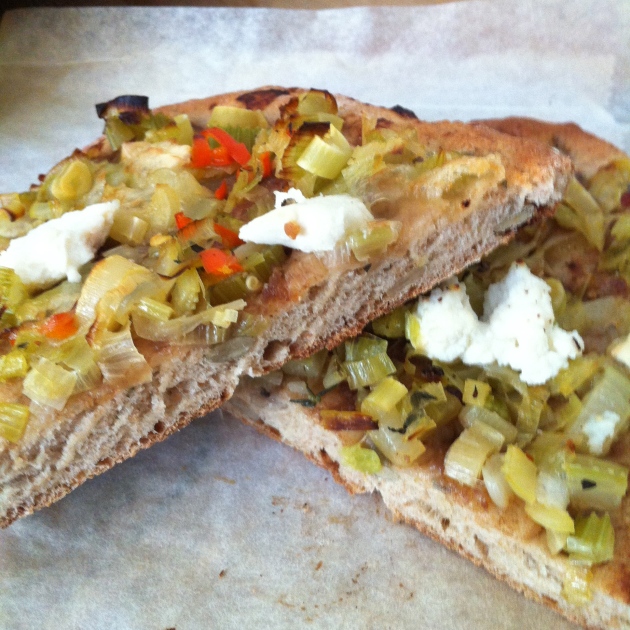
Thyme and Seed Pide with a Leek, Celery and Goat's Cheese Topping

  • Servings: makes 4 pide
  • Difficulty: easyish!
  • Print
Adapted from Dan Lepard’s Supper Flatbread Recipes in the Guardian INGREDIENTS For the pide:

  • 175 g all plain flour
  • 75 g spelt flour (or wholemeal)
  • 25 g sunflower seeds
  • 25 g pumpkin seeds
  • 1 Tbsp chopped thyme leaves (fresh)
  • 1 tsp fine salt
  • 175 g warm water (this is the same as 175 ml in volume. Weighing the water is a more accurate measure)
  • 25 g honey
  • 7 g sachet fast acting yeast

For the leek and celery topping:

  • 1 Tbsp olive oil
  • 100 g diced celery (3 stalks)
  • 2 shallots finely sliced
  • 140 g finely sliced leeks
  • water as required
  • 1 mini sweet red pepper finely diced
  • pinch of chilli flakes
  • 1 tsp finely chopped thyme leaves (fresh)
  • 60 g cubed or crumbled goat’s cheese
  • 12 tsp ricotta cheese
  • salt and pepper

For the tamarind and date sauce:

  • 10 soft pitted dates roughly chopped – soak them if they are dry
  • 1 ½ tsp tamarind concentrate
  • 100 ml water

INSTRUCTIONS For the pide:

  1. Measure out all the dry ingredients (not the yeast though) into a mixing bowl and stir well to combine.
  2. Measure the honey and warm water directly into a mixing bowl set on the scales and mix well to combine
  3. Sprinkle over the yeast and stir in.
  4. Add the dry ingredients and mix until it is a soft, shaggy, sticky dough (I used a chopstick to stir it round and round ).
  5. Cover and let this rest for 10 minutes.
  6. Lightly flour a work surface and very lightly knead the dough for about 10 seconds! It comes together very quickly.
  7. Place back in the bowl, cover and leave to prove for 30 minutes.

For the leek and celery topping:

  1. Heat the olive oil in a frying pain set on a medium low flame.
  2. Add the celery and shallots and sauté gently for 5 minutes to soften a little. Season with a good pinch of salt.
  3. Stir in the leeks. If there isn’t enough oil, add a splash of water to get things going – you may need to do this several times. Cook until floppy then stir in the thyme and red pepper and chilli flakes. Cook for a couple of more minutes, season to taste then take off the heat and leave to cool.

For the tamarind and date sauce:

  1. Place the dates and tamarin in a saucepan set over a medium low flame.  Add the water in splashes, stirring  with a wooden spoon to dissolve the tamarind – mash the dates with the back of the spoon too. Let this reduce to a thick lumpy sauce (mashing and stirring all the while) and take off the heat.
  2. Scrape into a wire mesh strainer and set it back over the saucepan. Using the wooden spoon, stir and press the mixture through the sieve until you are left with just the date fibre in the sieve. Scrape the sauce from the bottom of the sieve and into the pan.

To assemble and bake the pide:

  1. Pre-heat the oven to 240C/465F. Prepare 2 baking trays with parchment or silicone paper or dust with flour.
  2. Cut the dough into quarters (I weighed the dough, then divided it by four and tried to get 4 balls fairly equal in weight)
  3. Shape into balls by cupping and pushing the dough to stretch it out and get a smooth top.
  4. Cover and leave for 5 minutes.
  5. On a lightly floured surface, roll out each ball into an oval that is about 20 cm x 10 cm. Push at the edges to make a slight lip and lay on the prepared baking sheets.
  6. Spread a 1 ½ teaspoons of the tamarind date sauce on the dough, leaving the edges free.
  7. Top each pide with ¼ of the leek and celery mixture.
  8. Top this with the goat’s cheese and little blobs of ricotta.
  9. Bake for 10 – 15 minutes. Mine were ready in 10 minutes.
  10. Eat warm!
© Selma Jeevanjee and Selma’s Table, 2013 – 2015. Unauthorised use and/or duplication of this material, including photographs without express and written permission from this blog’s author and/or owner is strictly prohibited. Excerpts and links may be used, provided that full and clear credit is given to Selma Jeevanjee and Selma’s Table with appropriate and specific direction to the original content.

Swiss Chard and Herb Tart

swiss-chard-and-herb-tartMy veg box this week included some beautiful Rainbow Swiss Chard and to celebrate the gorgeous spring weather we have been having, I decided that I wanted to use them in a tart. A quick internet search brought me to a recipe by Ottolenghi which I knew I could adapt without  too much trouble. swiss-chard-and-herb-tartIsn’t rainbow chard beautiful? I read that the coloured shard stalks can bleed into paler colours when cooking but I didn’t find this to be a problem. Chard does need to have a good soak and swish in a sink full of cold water to dislodge any mud that may be clinging in the leaf crevices. The stems have to cook for a little longer than the leaves so do separate them and use them! swiss-chard-and-herb-tart swiss-chard-and-herb-tart The tart was really very delicious – the flaky pastry combined with the greens and cheese reminded me of of that wonderful Greek dish of Spanakoptika. And the textures work really well – slightly crunchy celery and chard stems,  buttery flaky pastry, soft greens and creamy cheese – we had this for a mezze type dinner and Jake, who invariably feels shortchanged if there is no meat, didn’t seem to notice and, unprompted, ate the left overs when he got home from school the next day. A printable recipe follows the photos below so you can scroll straight to that if you prefer not to read my ramblings but for those of you that can bear it, this is how I made the Swiss Chard and Herb Tart. swiss-chard-and-herb-tartFirst, fill the sink with water and swish the chard leaves about. Leave the in the sink for any grit to settle on the bottom and in the meantime slice the onion into half moons and start sautéing them. Slice the celery and add them to the onions. Scoop out the chard leaves and cut out the stems. Slice the chard stems and add to the pan. With lots of water clinging to the chard, slice the chard leaves and chop the herbs and garlic. When the celery has softened a little and become  translucent, stir in the  chard leaves, the herbs and the garlic. Let this cook down, stirring from time to time,  on a gentle heat for about 10 minutes. In the meantime toast the pine nuts (these burn quickly and I find it easier to do in the microwave for a couple of minutes – they don’t brown but get nice and crunchy), crumble the feta, grate the parmesan and zest the lemon. swiss-chard-and-herb-tartTurn the heat off under the pan and stir in the cheeses, zest and nuts. Season with lots of freshly ground pepper. Leave to cool. In the meantime, turn on the oven and beat the eggs. Unfurl the pastry onto a baking sheet and score a 2 cm border around the edge, using the back of a knife. Spread the cooled filling within the borders and crimp the edges of the pastry to form a lip. Brush the edges with the beaten eggs. Season what is left over of the eggs and pour slowly and evenly over the filling. Dot the top with teaspoons full of ricotta and slices of goats cheese. I also added some halved marinated cherry tomatoes and used some of the marinade to drizzle over the tart. This can of course, be substituted with fresh cherry tomatoes and olive oil. swiss-chard-and-herb-tart   Bake for half an hour and serve warm or at room temperature! swiss-chard-and-herb-tart swiss-chard-and-herb-tart 

Swiss Chard and Herb Tart

  • Servings: 4 as a main, 6 as part of a mezze
  • Print

adapted from Swiss Chard and Herb Tart by Ottolenghi for Channel 4’s Sunday Brunch

INGREDIENTS

  • 1 medium red onion, sliced (about 85 g)
  • 4 celery stalks, thinly sliced (about 220 g)
  • 1 bunch of Swiss chard; stalk and leaves separated; both roughly chopped (about 250g)
  • 2 cloves garlic thinly sliced
  • 3 Tbsp mint leaves roughly chopped
  • 3 Tbsp chopped parsley
  • 2 Tbsp olive oil
  • 100 g feta cheese crumbled
  • 50 g parmesan, grated
  • 15 g pine nuts toasted
  • zest of one lemon
  • 1 x 320 g sheet of ready rolled all butter puff pastry
  • 8 tsp ricotta cheese
  • 50 g (7 or 8 thin slices) of goat’s cheese
  • 5 cherry tomatoes halved (I used the marinated ones from this recipe of mine)
  • 2 beaten eggs

INSTRUCTIONS

  1. Heat the olive oil in a large pan over a medium low flame and add the sliced onions.
  2. While they cook, slice the celery and stir into the pan.
  3. Remove the stalks from the chard, chop these up and stir into the pan.
  4. Ribbon (chiffonade)  the chard leaves, slice the garlic and chop the herbs.
  5. Once the celery has softened a little, which should take about 5 minutes, stir in the chard, herbs and garlic. Let this cook down for about 10 minutes and take if off the heat.
  6. Stir in the feta, parmesan, lemon zest and pine nuts and season with a little salt  if necessary (the feta and parmesan are very salty) and a good grinding of pepper. Leave to cool.
  7. Preheat the oven to 200C/400F.
  8. Unfurl the pastry and score a 2 cm border around the perimeter.
  9. Place the cooled chard mixture within the border and crimp or pinch the edge of the pastry to form a lip.
  10. Dot the top of the chard mixture with the ricotta, goats cheese and cherry tomatoes.
  11. Brush the edges of the tart with the beaten egg and then gently drizzle the remainder over the tart.
  12. Bake for 30 minutes and allow to cool a little before serving

Eat warm or at room temperature. Serves 4 as a light main course with a salad and some cold cuts for the determined carnivores. Or slice into 12 and serve  as mezze for 6.

© Selma Jeevanjee and Selma’s Table, 2015. Unauthorised use and/or duplication of this material, including photographs without express and written permission from this blog’s author and/or owner is strictly prohibited. Excerpts and links may be used, provided that full and clear credit is given to Selma Jeevanjee and Selma’s Table with appropriate and specific direction to the original content.

Goats’ Cheese, Onion and Potato Bread with Thyme

SO_0212_Leiths_Bread

Photo by Stuart Ovenden

I had a big birthday recently. Ok, so it was two years ago recently. Knowing full well my passion for food, my dissatisfaction with my job and my hive inducing reaction to big changes in my life, my dear friends N and J sent me on a food styling course at Leith’s Food and Wine in west London in the hopes that I might find a truer calling and stop the whining I was subjecting them to.

It was an amazing experience run by the lovely Sarah Cook, Deputy Food Editor of BBC Good Food magazine. One of our first tasks was to try and recreate the “money shot” on a ready meal using a pack of M&S lasagne. Well that was an eye opener. In the UK, one cannot use more food in the photo than is in the ready meal itself. So in order to make the lasagne look fuller as in the pack photo, the pasta was separated from the ragout and the sauce as best as we could manage. Then paper towels were scrunched up and strategically centred on the pasta whilst filling in the edges with what now looked to be a terribly generous portion of ragout. Apparently, we could have used cardboard to level the floppy pasta sheets. We also got to make and style a Greek salad and a fruit trifle, using our own props, both of which were challenging! The course culminated with a professional photo shoot using food we had made. Sarah brought in some amazing props which she has been collecting, magpie like over the course of her career and we got to work with the uber talented Stuart Ovenden Food/Lifestyle Photographer & Deputy Art Editor, Good Food Magazine at BBC Worldwide.

I realised fairly early on in the course that placing bits of parsley with a set of tweezers was not for me – I like a more natural finish which is not to say that I don’t appreciate a beautifully styled shot – I just don’t have the patience for it and can drive myself to distraction agonising over which berry should be at the front of the shot. So when it came time to decide what to make for the shoot I remembered a Delia Smith bread recipe that I had earmarked from a long time ago and thought I would give it a try. I mean, why make something I had tried before right? Luckily I had had some sort of foresight to buy extra chèvre because of course the first loaf, delicious as it was, looked a complete and hideous mess. The second one turned out beautifully but as I was now running late, I had to pack it (and its ugly older sister), still warm, loosely wrapped in its parchment paper into a basket along with some props which I thought we could use and schlep across London on Sunday public transport to the school. The Tube has never smelt so delicious as I sat there pretending that it had nothing to do with me!

The ugly sister

The ugly sister

Second loaf prior to baking

Second loaf prior to baking

My photo of the second loaf

My photo of the second loaf

I fretted all the way there worrying that I had done something too basic – it wasn’t even a yeasted bread…and when I got to the shoot, my worst fears were confirmed. One person had prepared a trio of beautiful tarts complete with chocolate decorations. Another had made a meze of three or four Lebanese dishes – from scratch. Someone else  had caramelised a pear and made a ginger pudding with chocolate sauce…a fourth was doing some fantastic wizardry with a sugar candy machine to make candy floss “ice cream” cones.

I sheepishly laid out my props on one of the tables and pulled out the loaf , smoothing out the parchment paper to let it finish off cooling.  Sarah came over and said how wonderful it smelled and looked, Stuart came over, smiled and asked if he could have a piece of the ugly sister to eat and went back to shooting and before I knew it, most of the ugly sister had been eaten by people coming over to take a look. Still feeling a little sheepish when it was my turn I hesitantly took it over to the table where Stuart was working. He practically snatched it out of my hands and told me that he wanted to shoot it as it was, on the parchment it had been baked in and transported on and that props really would not be necessary as it was such a beautiful thing on its own.  I was speechless. Can I tell you that I’m ridiculously proud that he included it on his gorgeous blog appledrane, here some time later?

Below are some of the images that were shot on the day. Aren’t they gorgeous?

Leiths2

Leiths1

Looks aside, this is a really delicious bread, which smells wonderful. It is quick as no yeast is involved and goes well with a soup or with cold cuts. Yet another good candidate for a picnic.

GOAT'S CHEESE, ONION AND POTATO BREAD WITH THYME

  • Servings: 4-6
  • Difficulty: easy
  • Print

Adapted from Delia Smith
Makes one delicious loaf which will serve 4-6 people

INGREDIENTS

  • 180g log of firm goats cheese (chèvre)
  • 4 spring onions finely sliced
  • 1 spring onion coarsely sliced for the top
  • 175g (approx) red potato which is about a medium one
  • 1 generous Tbsp of chopped thyme leaves as well as a couple of sprigs for the top
  • 175g self raising flour plus a little more to sprinkle on the top
  • 1 tsp salt
  • 1/2 tsp cayenne pepper
  • 1 large egg
  • 2 Tbsp (30ml) milk
  • 1 heaped tsp of grain mustard

INSTRUCTIONS

  1. Preheat oven to 190 degrees Celsius.
  2. Lay a piece of parchment paper on a sturdy baking tray and butter a 6 inch loaf shaped area onto it.
  3. With a sharp knife, remove the rind as best as you can from the chèvre. Don’t worry if there are a few bits left on here and there. Then slice it into half inch cubes. Set aside about a 1/3 for the top.
  4. Sift the flour, salt and cayenne pepper into a bowl. I have found that I can get the same effect by putting all the ingredients into a bowl and using a balloon whisk to mix and aerate it.
  5. Peel the potato and coarsely grate it into the flour mixture. Tip in the finely sliced spring onions and 2/3’s of the cheese and mix it all together with a palette knife.
  6. Gently whisk the egg with the milk and mustard, then pour the mixture onto the dry ingredients. Using the palette knife, Bring it all together to a form a loose, rough dough.
  7. Tumble it onto the buttered parchment paper on the baking sheet and gently form it into a 6 inch (15 cm) rough loaf. Lightly press the rest of the cheese over the surface as well as the coarser chopped spring onion. Dust with a little flour and scatter over the small sprigs of thyme.
  8. Bake the bread on the middle shelf of the oven for 45-50 minutes or until golden brown. Remove it to a cooling rack and serve it still slightly warm if possible.

Makes one delicious loaf which will serve 4-6 people

© Selma Jeevanjee and Selma’s Table, 2013. Unauthorised use and/or duplication of this material, including photographs without express and written permission from this blog’s author and/or owner is strictly prohibited. Excerpts and links may be used, provided that full and clear credit is given to Selma Jeevanjee and Selma’s Table with appropriate and specific direction to the original content.