 These gorgeous Sour Cherry, Coconut and Oat Slices are so easy to make and very child friendly too by which I mean that it is something that you could make with young children if you were so inclined. Other than needing a knife to cube the butter into tiny pieces, there is no need for any implements other than a set of scales and a spoon.


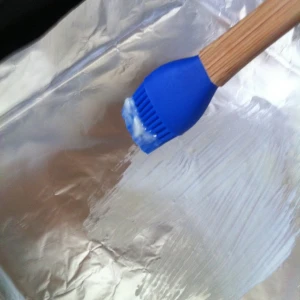
First, prepare your baking tin. There is a good description in the Baking section, over on my Tips and Tricks page – click on the link. Once you have papered it, either spray or brush on some melted butter.
-
- Stores are running low…
-
- Tinier cubes would be better!
-
- Rub in the butter
-
- Pat down and smooth
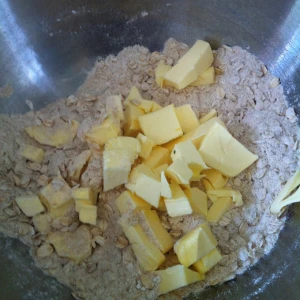
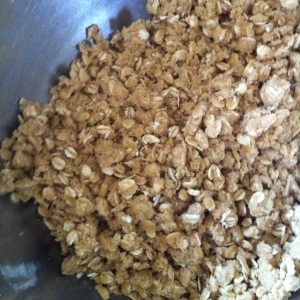
Then, it’s simply a matter of one bowl into which you mix the dry ingredients with your hands, breaking up any brown sugar lumps with your finger tips and then rubbing in the butter and patting most of the mixture into a prepared baking tin.
-
- Add the jam
-

- Even it out
-
- Add topping and coconut
-
- Baked till golden
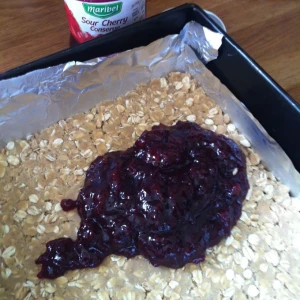
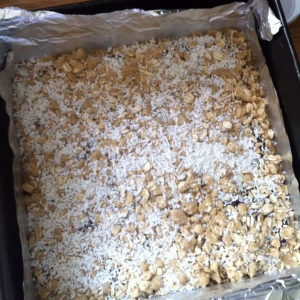
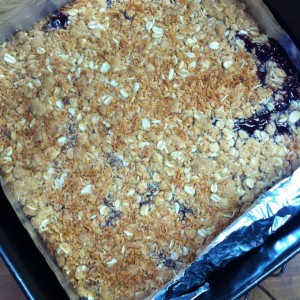
Spoon over the jam and sprinkle over the remaining oat and flour mixture and some shredded coconut and press it lightly into the jam. That is it. Then it goes into the oven and emerges looking like hipster cafe offering. You could drizzle a little melted white chocolate over it if you wanted to get all fancy pants but it looks and tastes rather lovely as it is.
 I resisted the urge to scatter over almond flakes even though almonds and cherries are a match made in heaven – it’s just that I tend to put them on everything! Instead I opted for shredded coconut which adds a lovely flavour.
 With such a short ingredient list, it is important to use good quality butter, and a really tasty jam. I admit to having a complete weakness for the Maribel jams from Lidl – the Sour Cherry Conserve is my absolute favourite.
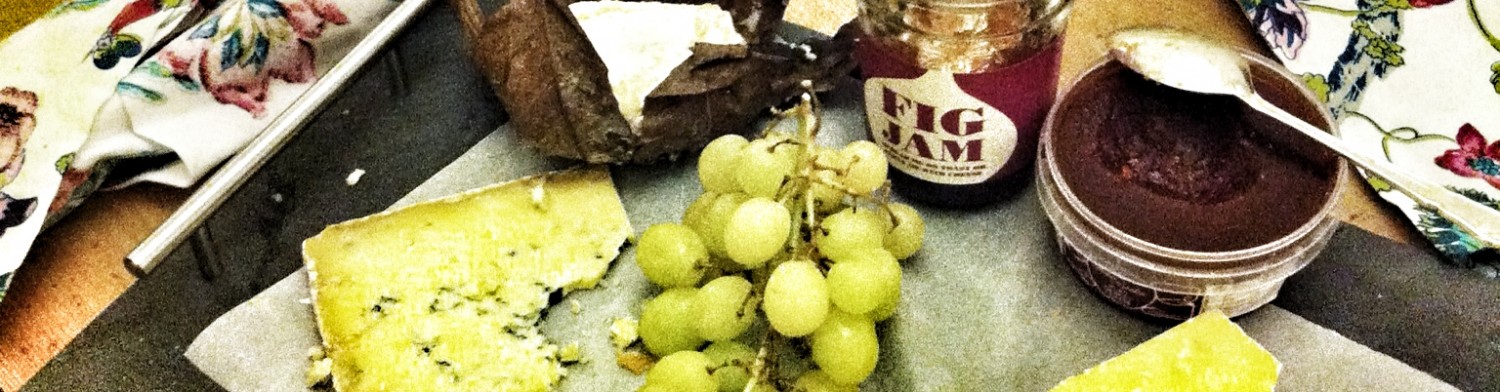
This recipe is endlessly adaptable – all sorts of combinations come to mind – blueberry jam with some lemon zest in it; fig jam with some crushed walnuts in the topping; apricot preserves with vanilla and definitely flaked almonds in the topping; strawberry or raspberry jam with white chocolate drizzled over the top when it has cooled…so many possibilities.
 If you have some homemade jam that needs using up – this is the recipe for you. Surprisingly, it’s not too sweet and is rather wonderful with a cup of coffee or a glass of milk. The recipe adapts easily to being doubled if you want to bake a big batch and the slices are sturdy so these are perfect as a hostess gift or for a bake sale.
 I am taking a large tray of these Sour Cherry, Coconut and Oat Slices over to Angie’s Fiesta Friday #68 which this week is being co-hosted by Justine @ Eclectic odds n sods and Jhuls @ The Not So Creative Cook.. I’ve not been for a few weeks and look forward to checking out the new venue (fiestafriday.net) and meeting the new bloggers who have joined in the virtual weekly party! Now where is the bar and who’s brought the cocktails?
Sour Cherry, Coconut and Oat Slice
Adapted from Raspberry Oatmeal Cookie Bars on Allrecipes.com
INGREDIENTS
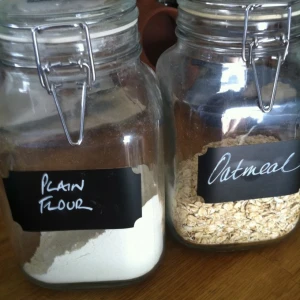
- 125g plain/AP flour
- 100g soft brown sugar
- 100g rolled porridge oats
- ¼ tsp baking powder
- good pinch of salt
- 115g cold, unsalted butter
- 250g sour cherry jam
- 2 Tbsp shredded coconut
INSTRUCTIONS
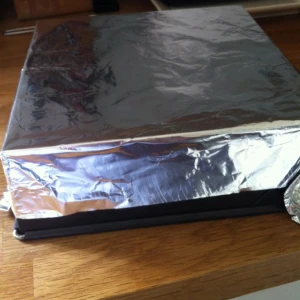
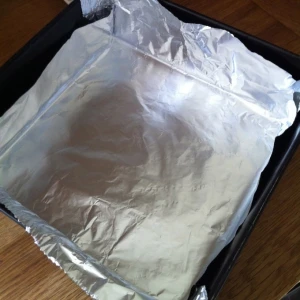
- Preheat oven to 180C/350F and line an 9″ square tin with baking parchment or aluminium foil, leaving a little overhang so that you can use them as handles later. Grease the bottom and the sides of the paper.
- Combine the flour, sugar, oats, baking powder and salt in a medium sized bowl, mixing well.
- Cut the butter into the smallest cubes you can and thoroughly rub into the flour mixture.
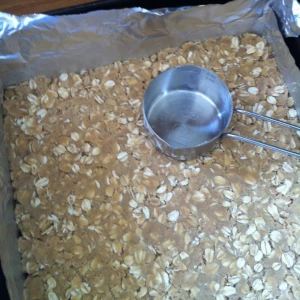
- Set the prepared baking tin onto the scales ands set to zero. Measure out 300g of the mixture into the baking tin and press evenly onto the bottom of the pan. Make sure to get into the corners. Smooth the top by running a flat bottomed glass over it.
- Spread the sour cherry jam over the surface to within 1 cm of the edges. The jam spreads as it bakes so this prevents it from seeping from the edges and burning.
- Sprinkle over the remaining flour mixture and evenly top with the shredded coconut. Press lightly into the jam.
- Bake for 35 – 40 minutes or until golden. Leave in the tin on a rack, to cool completely. Then using the paper overhang, lift the bake out of the tin and onto a chopping board. Using a long knife or a pizza cutter, slice into squares.

 Browsing through Woolworths’ South African website, I came across this intriguing recipe for Milk Tart, which is apparently, the ultimate braai recipe. It’s very unusual in that it is a really liquid batter but it does work and is absolutely delicious.
 As a bonus, the house smelt amazing too – cardamom and cinnamon baking together is just such a wonderful smell! I think that this would be a lovely alternative to a chocolate dessert for easter lunch – it can be made a couple of days ahead and refrigerated so is absolutely perfect for entertaining.
 I must admit that my heart stopped when I realised how much liquid I was dealing with and I gingerly put it in the oven not expecting it to work at all but it did. “Folding” the egg whites into so much liquid was not easy.
 I think it would work better if the egg whites were folded in to only half the liquid and the rest stirred through. I used the last of the blood oranges to make this but you could of course, use conventional oranges.
 Not wanting any waste, I made a lovely syrupy orange sauce to go with it using sweet dessert/pudding wine, sugar and orange segments. If you don’t want to use a sweet wine, then just add a little orange juice instead.
 I am thrilled to be co-hosting Fiesta Friday #61 with the incredibly talented
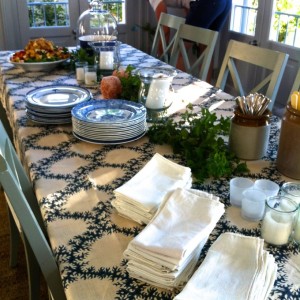
 While I was in Cape Town, I stayed with friends in their
  In their fabulous kitchen, antique blue and white Spode plates jostle for position on the open shelving with contemporary blue and white bowls and mugs; bone and silver cutlery is stored in earthenware jars, fruit and vegetables are displayed in blue and white bowls on the island and silver and glass cloches are in constant use to cover food which has been prepared. Mixing old and new, marble and wood – the kitchen is just such joy to work in.
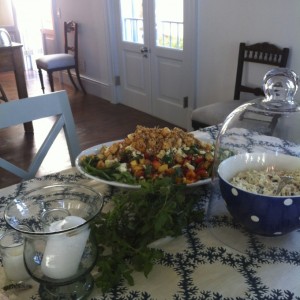
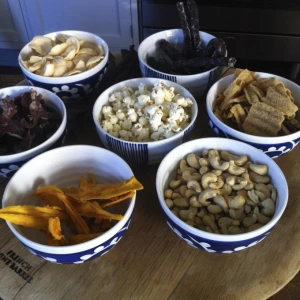
 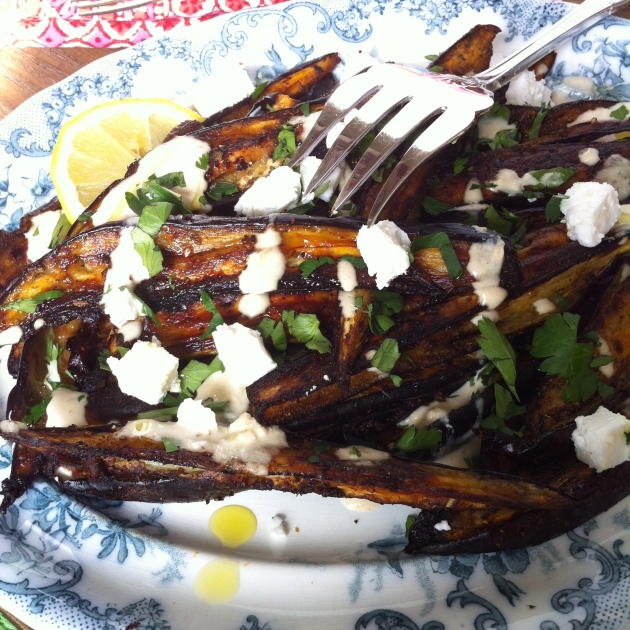 The evening before the wedding, they had planned to host a “casual” braai (barbecue). We had all had all been to a cocktail party the night before, at the grooms’ (also stunning) house and some of us were feeling a little fragile! Nonetheless, that morning, Justin went off shopping, coming back with bags full of fresh produce, tender beef and cases of bubbles. Jake was arriving that afternoon, flying out straight after finishing his last mock exam and had to be collected. On the way to the airport we discussed the menu and what had to be done. Traffic was horrendous which meant we were running a little late and Justin had some work to do when we got back, so I assumed the role of sous chef and set about chopping ingredients for a salad and marinating the beef for the barbecue.
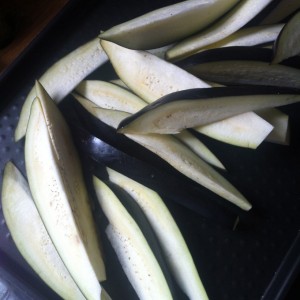
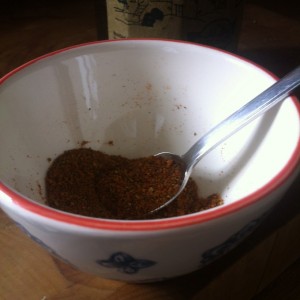
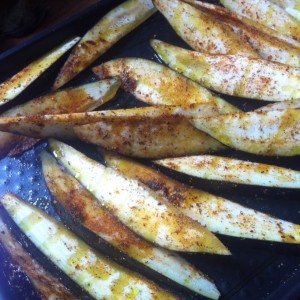
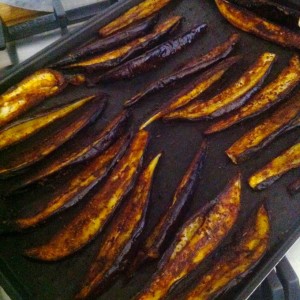
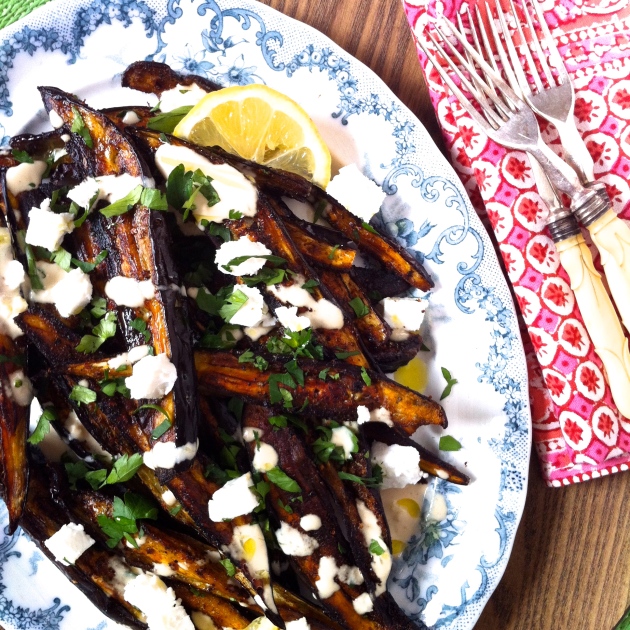
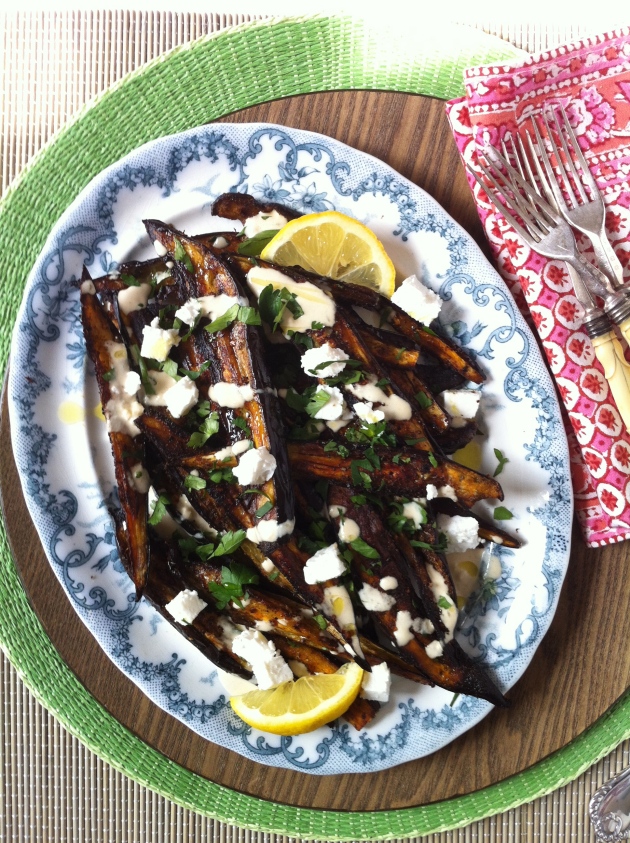 I couldn’t wait to re-create this when I got back.
 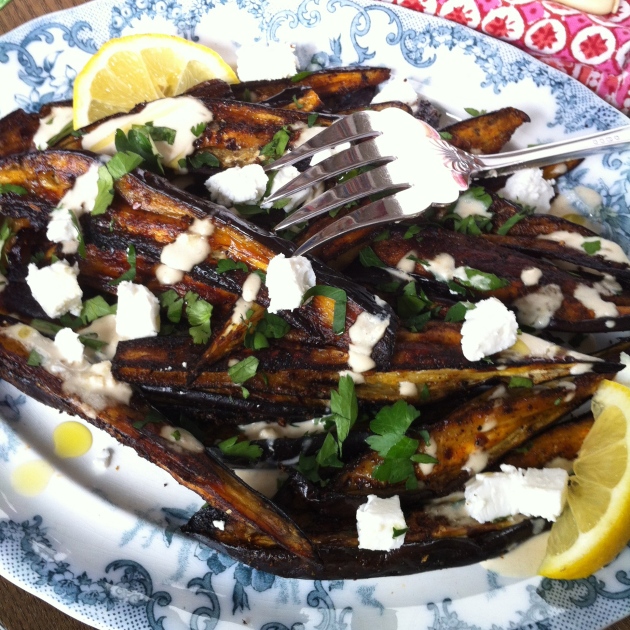 I use the chermoula as a dry rub, coating the aubergine wedges after tossing them in olive oil. The wedges are roasted, turning them over halfway through the cooking time and roasting until the edges are crispy and the thicker bits are soft and squidgy. It’s that wonderful combination of flavours and textures; soft and crispy with a nutty, smokey, tart and salty flavour with the freshness of the chopped parsley and coriander leaves. Delicious with barbecues, as a side to roast lamb or chicken or as part of a mezze.


 One of the few benefits of globalisation is the exposure and the availability we now have to a huge variety of fruits and vegetables. In England, garlic, which was once regarded as foreign muck is now as ubiquitous as the humble spud.
  I can’t remember when I first saw my first


 I am sharing these with those die-hard party goers at Fiesta Friday, hosted by the talented
  Win a copy of FIVE by Rachel de Thample!


 I almost didn’t post this recipe, hence the lack of photos, in progress or otherwise! I’ve been making these Sensational Meatballs and Lentils for about 8 years (since 2006 according to my notes) and it was Jake who suggested that I share the recipe here on the blog when I made it the other day. It came about the usual way – picking up a few bits on the way home from work and seeing what was in the cupboards to supplement the ingredients – a bit like Ready Steady Cook! The resultant deeply flavoured, lemony Meatballs and Lentils were so delicious that I wrote up the recipe in my notebook.
 You start by rolling the meatballs, then sauté the onions, then the meatballs with the seasonings; stir in the stock, lentils, lemon juice and tomatoes and let the whole lot simmer away while you get the rice on and prepare the spinach which gets stirred in a couple of minutes before the end. That’s it!! I urge you to give the Meatballs and Lentils a try – the dish is absolutely sensational!

 My recipe for Roast Pumpkin and Walnut Squares compliments and showcases the fruitiness of one of one of Tetley’s latest blends – Green Tea with Peach and Apricot.
 I soaked some sultanas in a very strong brew of the tea which absorbed the fruity flavours perfectly. I roasted the seasonal crown squash that was in my
  I whizzed up a buttery, oaty, nutty base & topping, layered up and baked it then drizzled the squares with a lemony yogurt glaze. The result reminded me a little of the flavours of a baklava – sweet, spicy and nutty! I found that it sets up best overnight and even tastes better as all the flavours mature.
 I am taking these delicious Roast Pumpkin and Walnut Squares over to Angie’s to share with the revellers at her popular
 I had half a
  I make my pancakes quite small – I use a table spoon to measure them out the batter with and they are only 3 inches wide but I just prefer that as portion control and they are easier to flip too, that the ones than use a half cup measure.
 I’m always looking for ways to speed up preparation or just make things easier in the kitchen generally. I find the least stressful way to roast squash is to slice it in half, remove the seeds, drizzle with a little oil and then roast the squash in it’s skin. Once cooked, the skin simply peels off. In this case, I scooped out the seeds, cut the squash into wedges and roasted them at 200C/400F for 20 minutes until they were tender.
 These pancakes are not ethereally light and fluffy like my


 A clementine or satsuma is part of our breakfast these days, in the vain hope of keeping at bay, the season’s coughs and colds but a recent purchase of a bag of clementines yielded mouth puckering, lip curling, sour fruit that neither of us can eat. Rather than throwing them away, I have been using them in place of lemons for a similar return in acidity but with a softer more floral flavour.
 I placed all the ingredients in a roasting tin – not too large or there won’t be any sauce left, gave them all a good stir, covered the tin with foil which I removed for the final 20 minutes. You can substitute the clementines with an orange or lemon and the sage for rosemary, thyme or oregano. I always add whole, unpeeled cloves of garlic whenever I roast chicken. After cooking you end up with a nugget of very mellow, gooey garlic paste which squeezes easily from it’s papery shell and is wonderful smeared onto a forkful of chicken. Some of the smaller cloves caramelise and become chewy. They are all such a treat and also very good for you!! Citrus Chicken with Sage is a really delicious meal for very little effort.
 I am sharing my Citrus Chicken with Sage with the
 It was Jake’s birthday a few weeks ago and I made him these fabulous Ambassador Cupcakes to take to a party that one of his friends was throwing for him. He is not a big fan of chocolate cakes and icing, though he loves chocolate, but when I mentioned that I could make them with a Ferrero Rocher chocolate inside as well as on top of them, his eyes lit up, so that was that!
  I’ve been making birthday cakes for Jake, for friends and for their children for quite a long time now. I thought that you might like to see a selection of Jake’s birthday cakes over the years including the train that nearly turned me into a train wreck which I mentioned in my post on the
 For these Ambassador Cupcakes, I was inspired by Michelle’s (Giraffes Can Bake) spectacular
  These Ambassador Cupcakes really are a special occasion cupcake. They require 48 Ferrera Rocher chocolates which really ratchets up the cost however, they look fabulous! If you are going to make these and don’t have a piping bag or nozzles, then please, do get some. You can buy a roll of disposable piping bags and a set of basic nozzles inexpensively from most large supermarkets and on-line too. Yes, of course you can scrape the icing on with a spatula or fill a sandwich bag, snip off a corner and squirt it on but if you are going to go to the expense and effort of making these, then for a few pounds more you can make them look really lovely too. I just wish that I had been more organised and ordered gold paper cases – that would have looked stunning and very in keeping with the Ferrero Rocher image! Remember this TV commercial?
 I ended up using the last technique which she likens to an old fashioned swimming hat. My nozzles are quite small in comparison to Xanthe’s – larger ones are on my hit list – but I got a lovely effect, nonetheless!
  And a little tip; the easiest way to fill a piping bag is to fit the nozzle and coupler if you are using one, onto the piping bag, then set this inside a tall glass, peel back the bag over the glass and fill.


 A Roast Chicken and Other Stories


 As this blog has gathered pace and found it’s feet, so Jake has learned his place in the hierarchy – photos first, then he gets to eat. He always asks before cutting into a cake or digging into a casserole – well, until Sunday just gone. I baked this Plum and Cinnamon Cake, uploaded a quick snap to
  Jake had got in late, couldn’t resist the smell or the look of it, didn’t dare try to take the ring off the springform pan so cut it out the best he could. He said he thought I was sleeping which is why he didn’t ask. Well, I’m not one to get upset when it comes to food being eaten so I determined to do the best I could with it, when it came to the photos. A bit of crumb tidying, fruit prodding and a dusting of icing sugar took care of most of it but the missing slice is well and truly missing!!


 The batter is quite meagre and you will feel that it won’t be enough, once you spread it out and that maybe an additional egg or more baking powder or a smaller tin…don’t panic, don’t fiddle – it comes out perfectly. The original recipe calls for halved plums skin side up but I quartered mine so that some of flesh got the heat of the oven. And you want to go for tart, ripe ones for the best result. It does seem better the next day – the whole thing softens and the plums get jammy. And the smell – no wonder Jake couldn’t resist helping himself to a slice!!
 The cake rises just enough to cushion but not encase the plums and the combination of the sweet, tender, vanilla sponge, the tart juicy, jammy plums and the sugar and cinnamon dusted top is utterly heavenly! I am helping a friend host a Macmillian Coffee Morning fundraiser next week and this is definitely going to be served.
 I’ve tweaked it a little – I’ve added vanilla to the batter and added less cinnamon to the top. Next time I may reduce the sugar a little too but if the plums are more on the tart side than the sweet sponge is the perfect foil for them. And it’s really easy to make. Quarter the plums and set aside. Whisk the flour, baking powder and salt in a small bowl and set aside. Cream the softened butter and sugar then add the eggs, one at a time, finally mix in the flour and scrape into the prepared tin. Arrange the plums over the top, sprinkle with cinnamon and sugar and bake!

